hostess gifts: overnight guest

Summer is in full swing my friends, which means its time to take everyone up on their offers to “visit us anytime!”
Especially the ones that live in exotic locales and more temperate climates.
Its 100 degrees in Houston right now.
MUST. LEAVE. TOWN.
But seriously, if you’re headed off to visit a friend or family member, be a dear and thank them properly for their hospitality.
Here are a few of my favorite gifts to bring when Whitney and I are staying with someone:
Caramel Cake from Caroline’s Cake

I’ve written about the amazing caramel cakes from Caroline’s Cakes before and I stand by my assessment that it is the most delicious cake on earth. The layers of cake are delicate and not overly sweet, which pairs perfectly with the sugary caramel frosting.
Send this cake ahead of your arrival and your guests will welcome you with open arms.
State-Shaped Cutting Board and Cheese

There’s a cutting board for every state in the union (though Hawaii and Maryland seem like they’d be impossible to actually use) and they make the perfect personalized gift. Swing by a grocery store on your way into town and pick up some good cheese and you’re set.
I think this gift is a win because its the best of both worlds — something to eat and something the hosts can hang on to for a long time. And if you manage not to burn down their house while visiting, they will probably think of you and smile fondly each time they pull it out.
Paella Kit

I actually bought this kit for myself before ever purchasing it as a gift. I was overwhelmed by the idea of making paella and wanted some of the work done for me. As it turns out, the hype is absurd — paella is easy and infinitely customizable according to your tastes.
If your hosts are foodies, they’ll love this kit. Kick it up a notch by offering to make paella for everyone during your stay.
Drink Kit

This is a great substitute for the all-too-common bottle of wine gift. If your hosts are adventurous, put together a fun cocktail basket with the ingredients for a speciality drink. A Moscow Mule is fun because you can include the copper mugs in which the drink is famously served.
Be sure to write the recipe down and stick it in the basket so your hosts can continue to recreate the drink long after you’re gone.
Here’s how to make a Moscow Mule:
Fill the mug three quarters full with crushed ice. Squeeze half of a lime over the ice then add 2 oz. vodka. Pour 4-5 oz. ginger beer over the ice and give it a quick stir before serving. Garnish with a slice of lime.
If you don’t feel like creating a drink kit on your own, send the Summer Sipper from Mouth. It includes artisan cocktail mixes that everyone will be dying to try.
Popcorn Kit

Visiting a popcorn lover? Pack up a basket with a jar of heirloom kernels, some good grapeseed oil, and this cute popcorn spice kit. It includes twelve seasonings that put the popcorn over the top — including caramel, barbecue, dark chocolate, garlic, jalapeño, kettle corn, parmesan, salt & vinegar, and cajun.
The components don’t take up much room, so you can pack it in your luggage without sacrificing too much space or weight!
This may not be as important to some of you, but I’ve had to use all of my wily charms the last few times I have flown so that the ticketing agent doesn’t charge me for my bag, which I can never quite get below 51.5 pounds.
I can handle the charges for extra legroom, in-flight snacks and DirecTV, but please dear God let me pack 60 pounds for a long weekend without having to cough up cash.
Zingerman’s Weekender

The Weekender is an easy way to cover all of your bases. This fun box is filled with a loaf of Zingerman’s artisan bread, a tin of Virginia peanuts, a walnut-studded magic brownie, a pecan blondie, Smooch Lion natural gummis, Belgian butter cookies, a ginger jump-up molasses cookie, John Macy’s cheesesticks, a couple jars of British preserves, and a sour cream coffee cake.
Also check out Mouth and Dean & Deluca, which both have a great selection of gift baskets curated for all tastes.
__________________________________________________________________________
No matter what you choose to bring, the best hostess gift of all is a thank you note!
What are your favorite gifts to bring when you visit someone overnight?
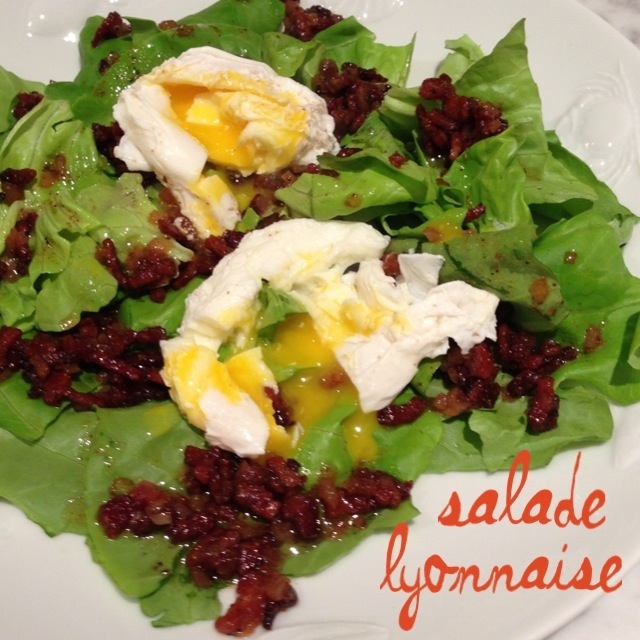
salade lyonnaise
Here’s a funny fact: I didn’t eat green stuff (except, as my grandfather likes to point out, green M&Ms) until I was like 20.
I was a picky eater as a kid and could find specks of offensive food in anything I was eating. If there was even a trace of lettuce in my taco, I would refuse to eat it.
“God gave picky people good eyes,” I liked to say.
And while I’m now a really adventurous eater and there are only a few things I don’t like, I still think I could go through life without ever consuming salads.
Unless the salad is covered in bacon and poached eggs. I make exceptions for bacon.

Salade Lyonnaise
head of butter lettuce
2 tbsp. extra virgin olive oil
4 slices bacon, diced
1 shallot, minced
2 tbsp. + 1 tsp. sherry vinegar
1 tbsp. Dijon mustard
Salt and pepper
2-3 eggs
1 tbsp. white vinegar or lemon juice
To make the dressing, heat olive oil in skillet over medium heat. Add bacon and cook slowly until crisp, about 7-8 minutes. Add diced shallot and cook for a minute until softened. Add vinegar and mustard to the skillet and bring just to a boil, stirring, then turn off heat. Add salt and pepper to taste and stir to combine.
In a medium pot, bring about two inches of salted water to a boil then lower heat to barely bubbling. Stir in 1 tbsp. white vinegar or lemon juice. This helps the eggs stay together. One at a time, crack the eggs and slip them into the bubbling water. Cook eggs for 3 to 5 minutes, just until the white is set and the yolk has filmed over. Remove each egg with a slotted spoon and drain briefly on paper towel.
Pour the warm dressing over the greens (they should wilt just a bit), then top each portion with an egg and serve immediately.
maker’s mark marshmallows

Whitney sent me this link the other day for bourbon marshmallows with a comment about how good they looked. For some reason, the thought of paying for the marshmallows didn’t bother me, but paying shipping for something I could easily make at home did.
This is what Amazon Prime has done to me, people. I can no longer pay shipping for anything.
So, I started looking up recipes and testing. Almost every single recipe called for high fructose corn syrup, which bummed me out because I never use it (in fact, I didn’t even have a bottle in my pantry and had to go buy some). But corn syrup is to natural sweeteners what safflower oil is to olive oil — it has a higher smoke point and doesn’t break down at high heats. Using just honey, maple syrup and agave nectar would cause crystallization in the marshmallows.
Ain’t nobody got time for that.
But don’t scrap the natural sweeteners altogether. These turned out perfectly when I used 1/2 agave nectar and 1/2 corn syrup.
Anyway, these are like fluffy, perfect little pillows of heaven that smell like LSU Game Day (’cause of the Maker’s). Once you’ve had these, I really don’t think you’ll be able to go back to the bags of Kraft Jet-Puffed Marshmallows again.
Use them in s’mores, in hot chocolate, or my favorite — just plain snacking.
And if you don’t want to use Maker’s Mark, or are just looking for another variation, try adding brewed coffee, red wine, or Kahlua in place of the whisky. Or use water in place of the whisky and add a few drops of lemon juice and zest, or butterscotch extract, or peppermint extract when its all in the mixer. You could also swirl in melted caramel or melted chocolate once the marshmallow batter has been poured into the pan. Seriously. Get creative and the possibilities are endless.
Here’s how it goes:
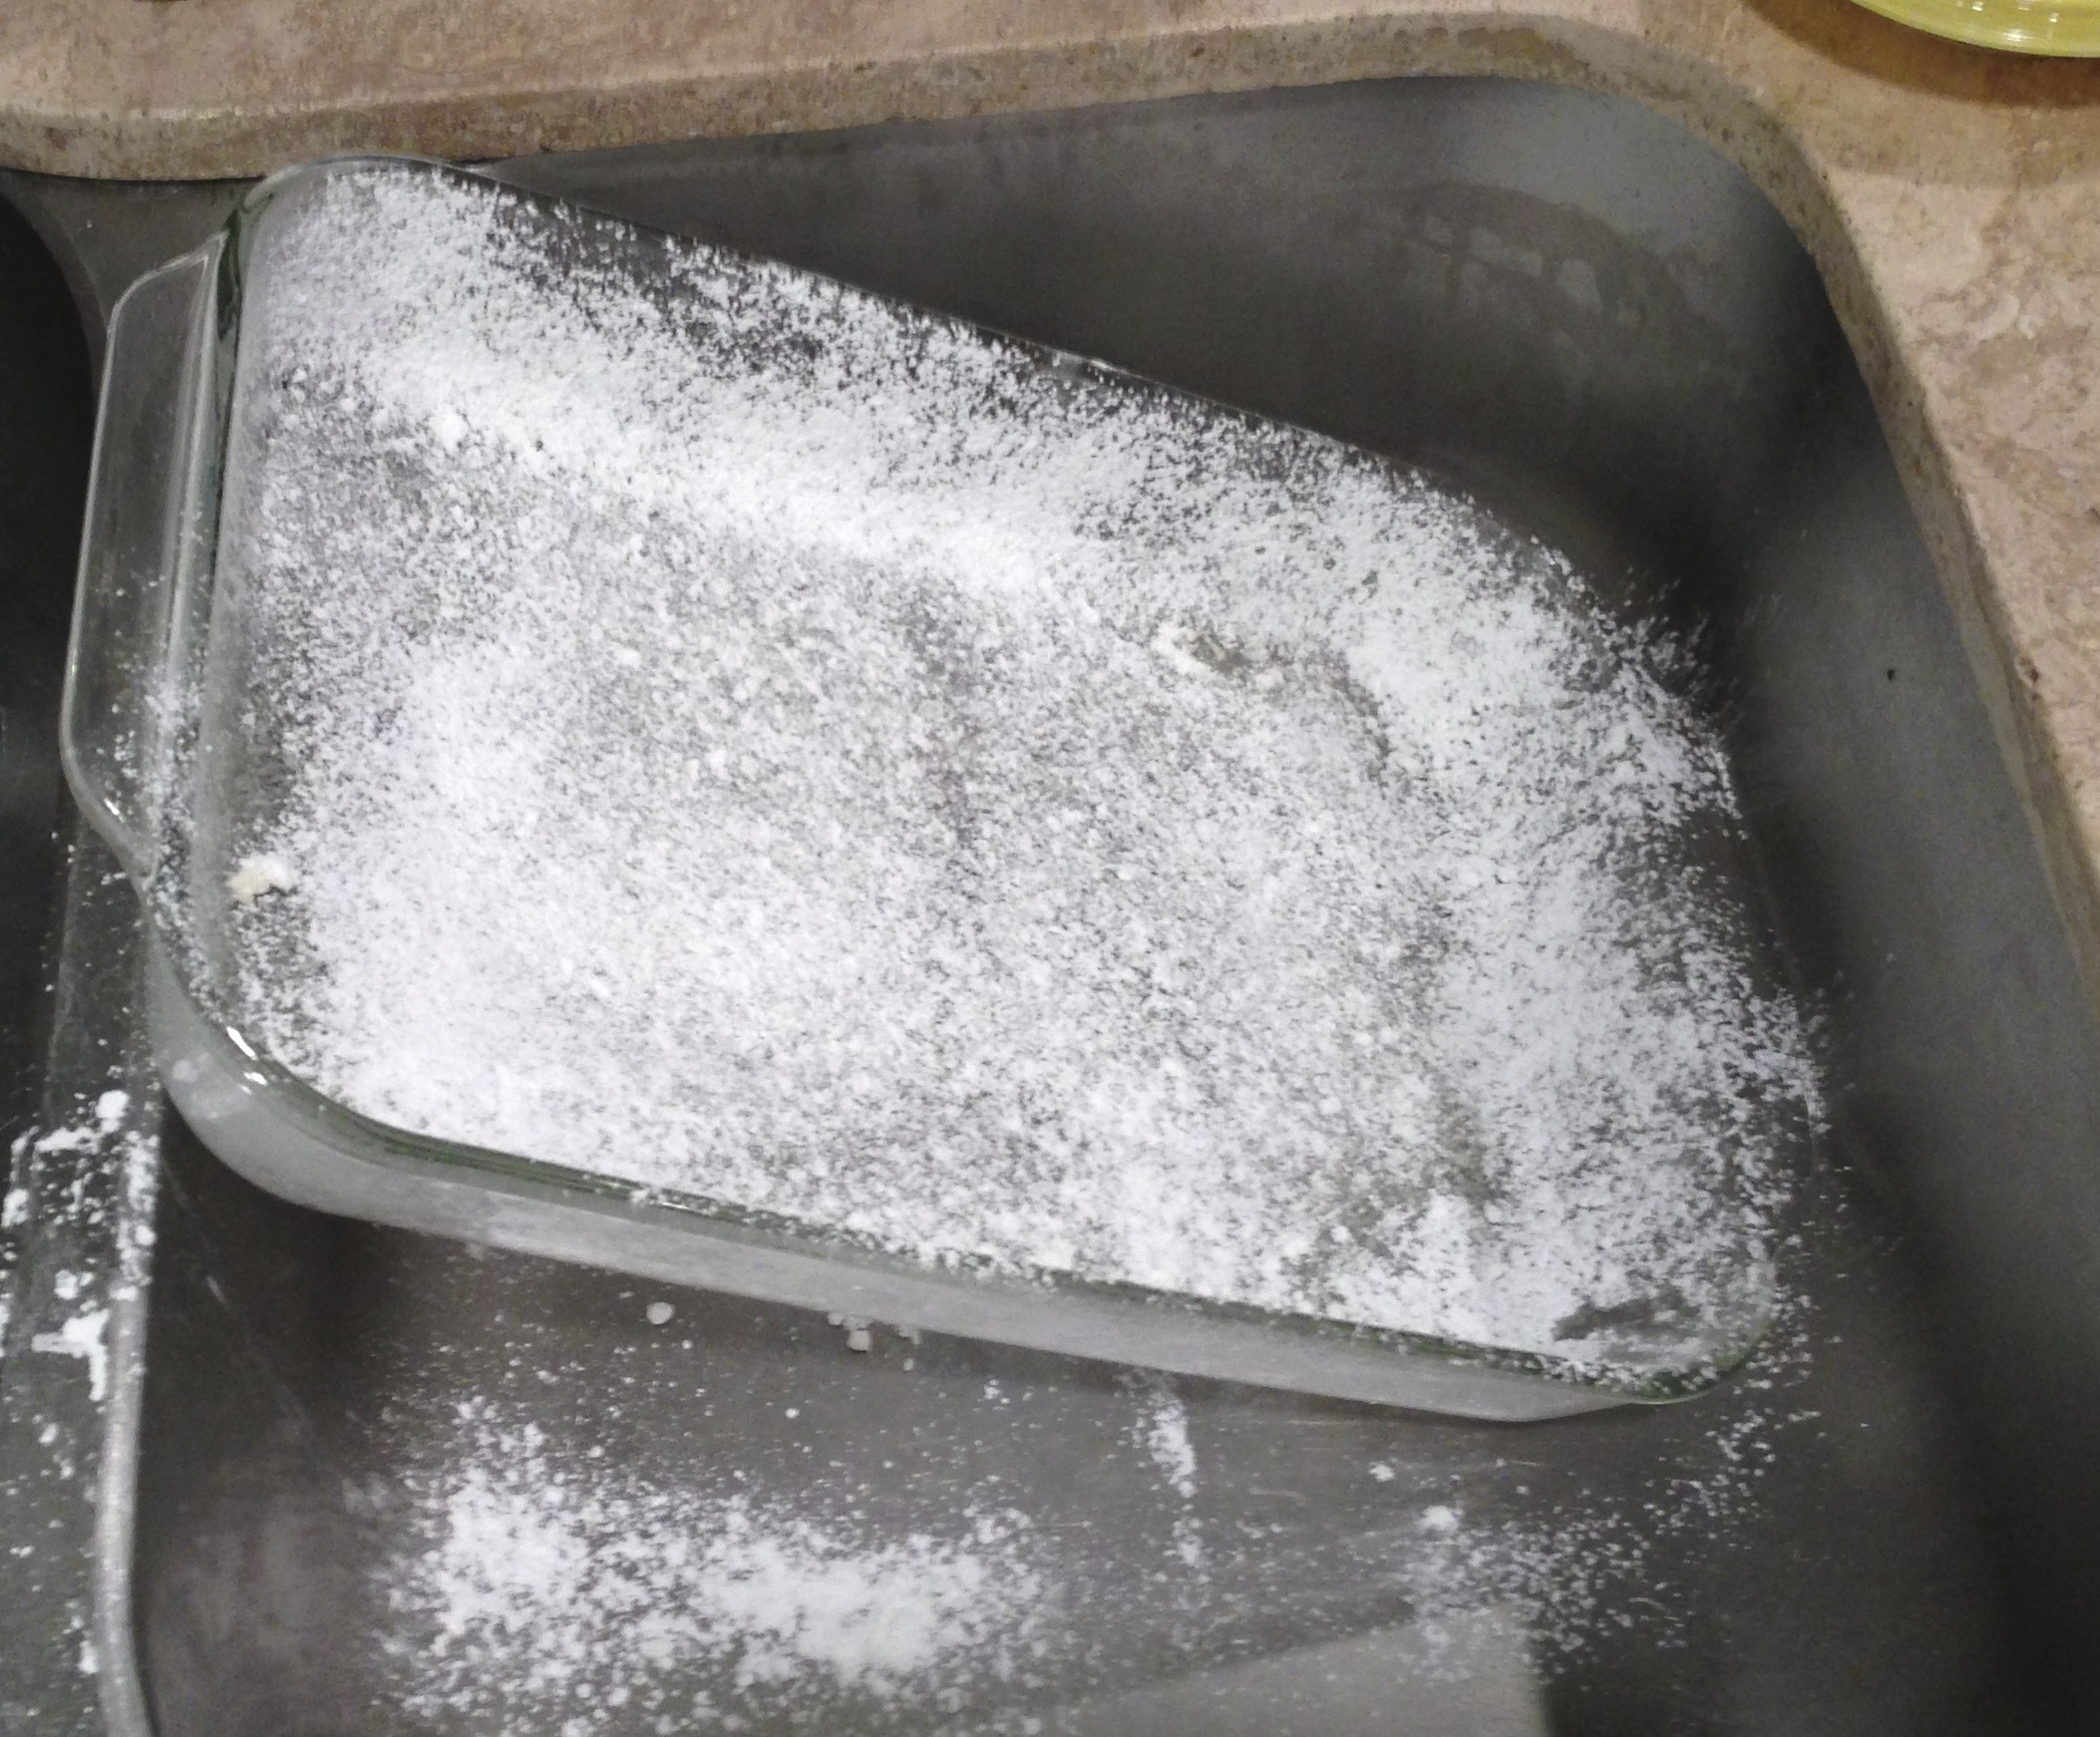
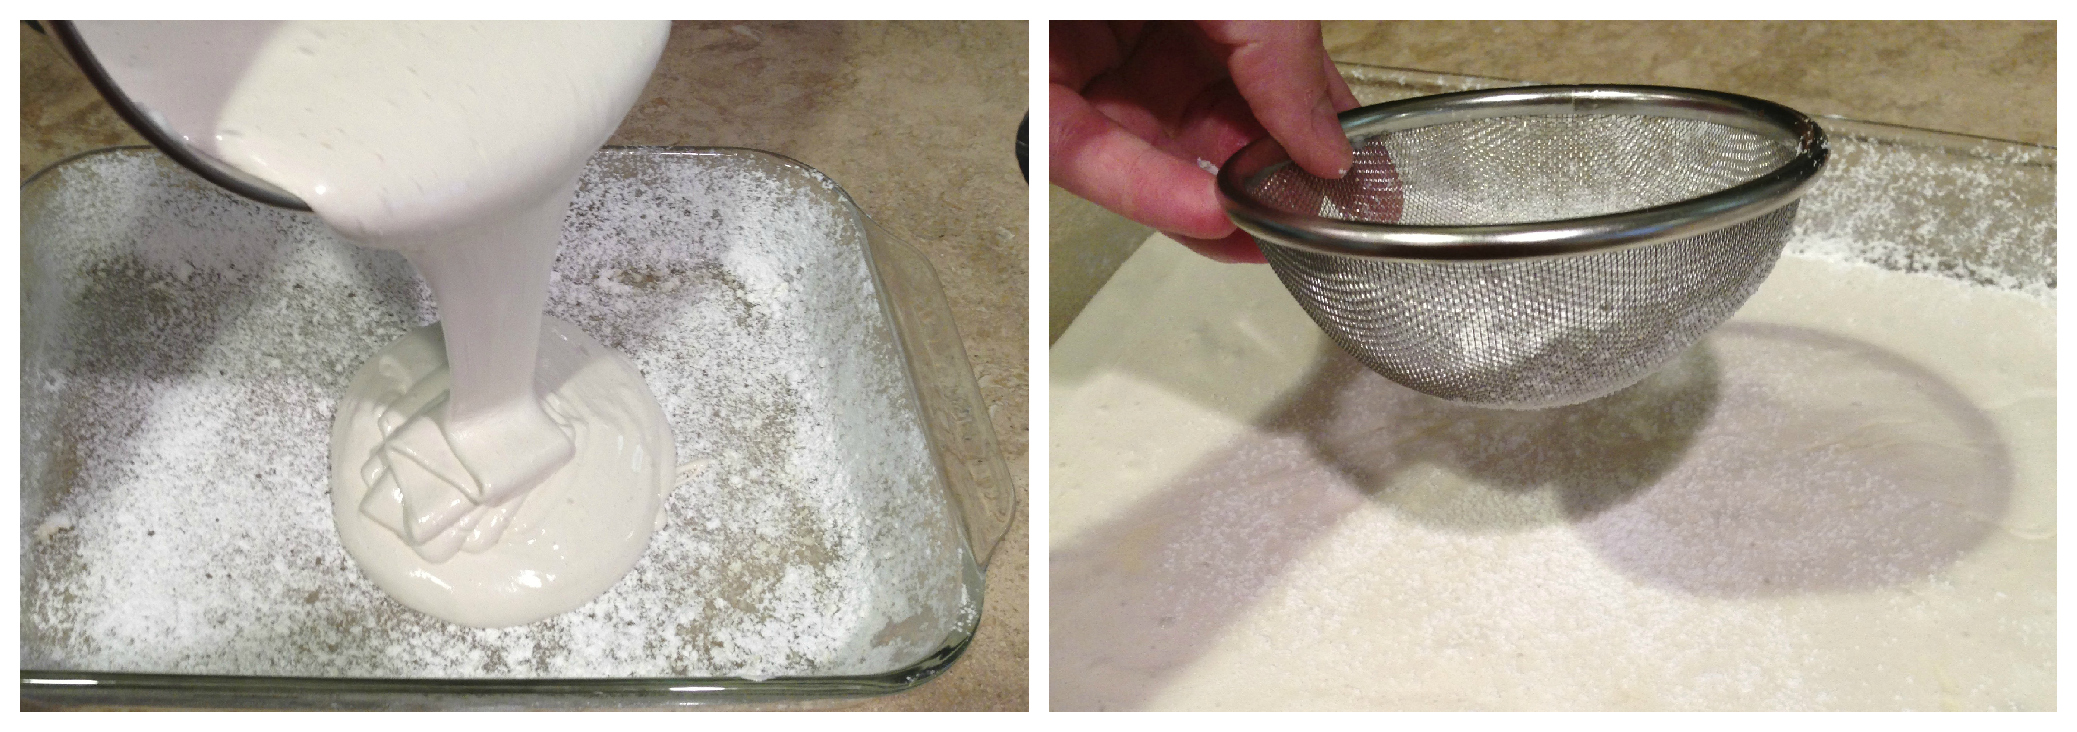
Spray a 9 x 13 baking pan with Pam and dust it with powdered sugar until it is coated. Do this in your sink. It will be a hot mess no matter how careful you are. Set it aside.
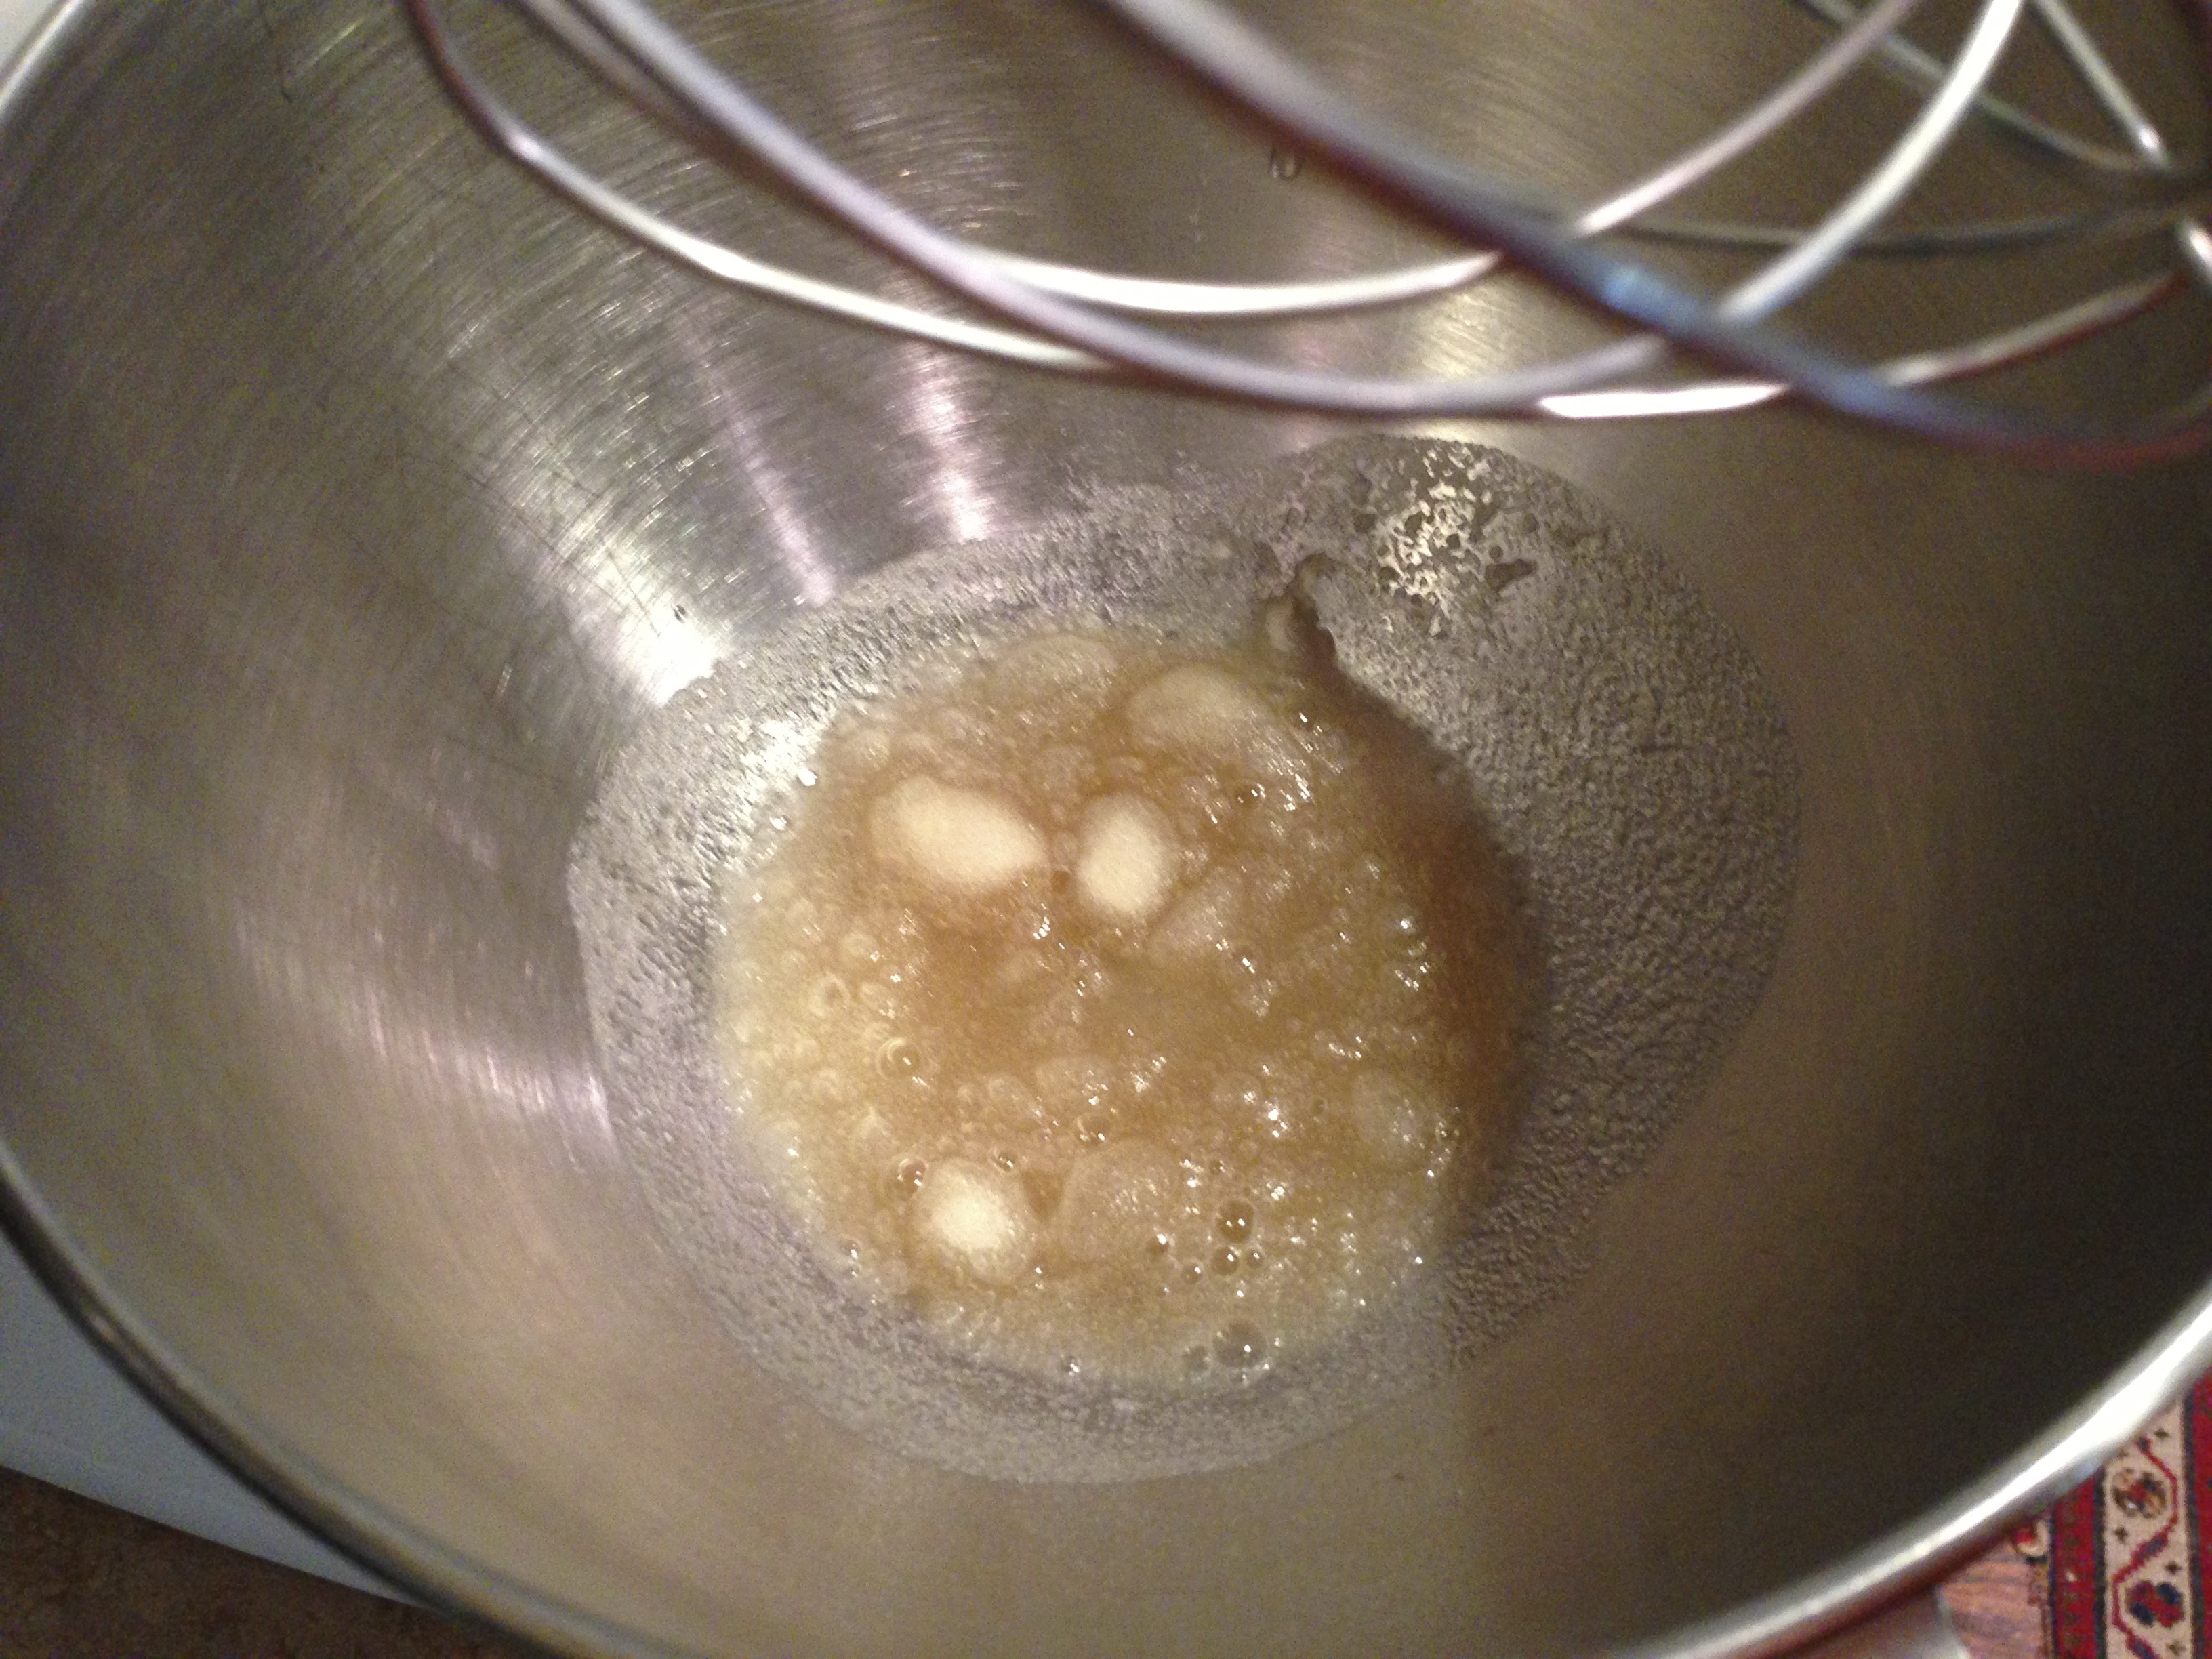
In the bowl of a mixer, stir 1/2 cup cold water and 3 1/2 packs of gelatin together until it is just combined. Let it sit.
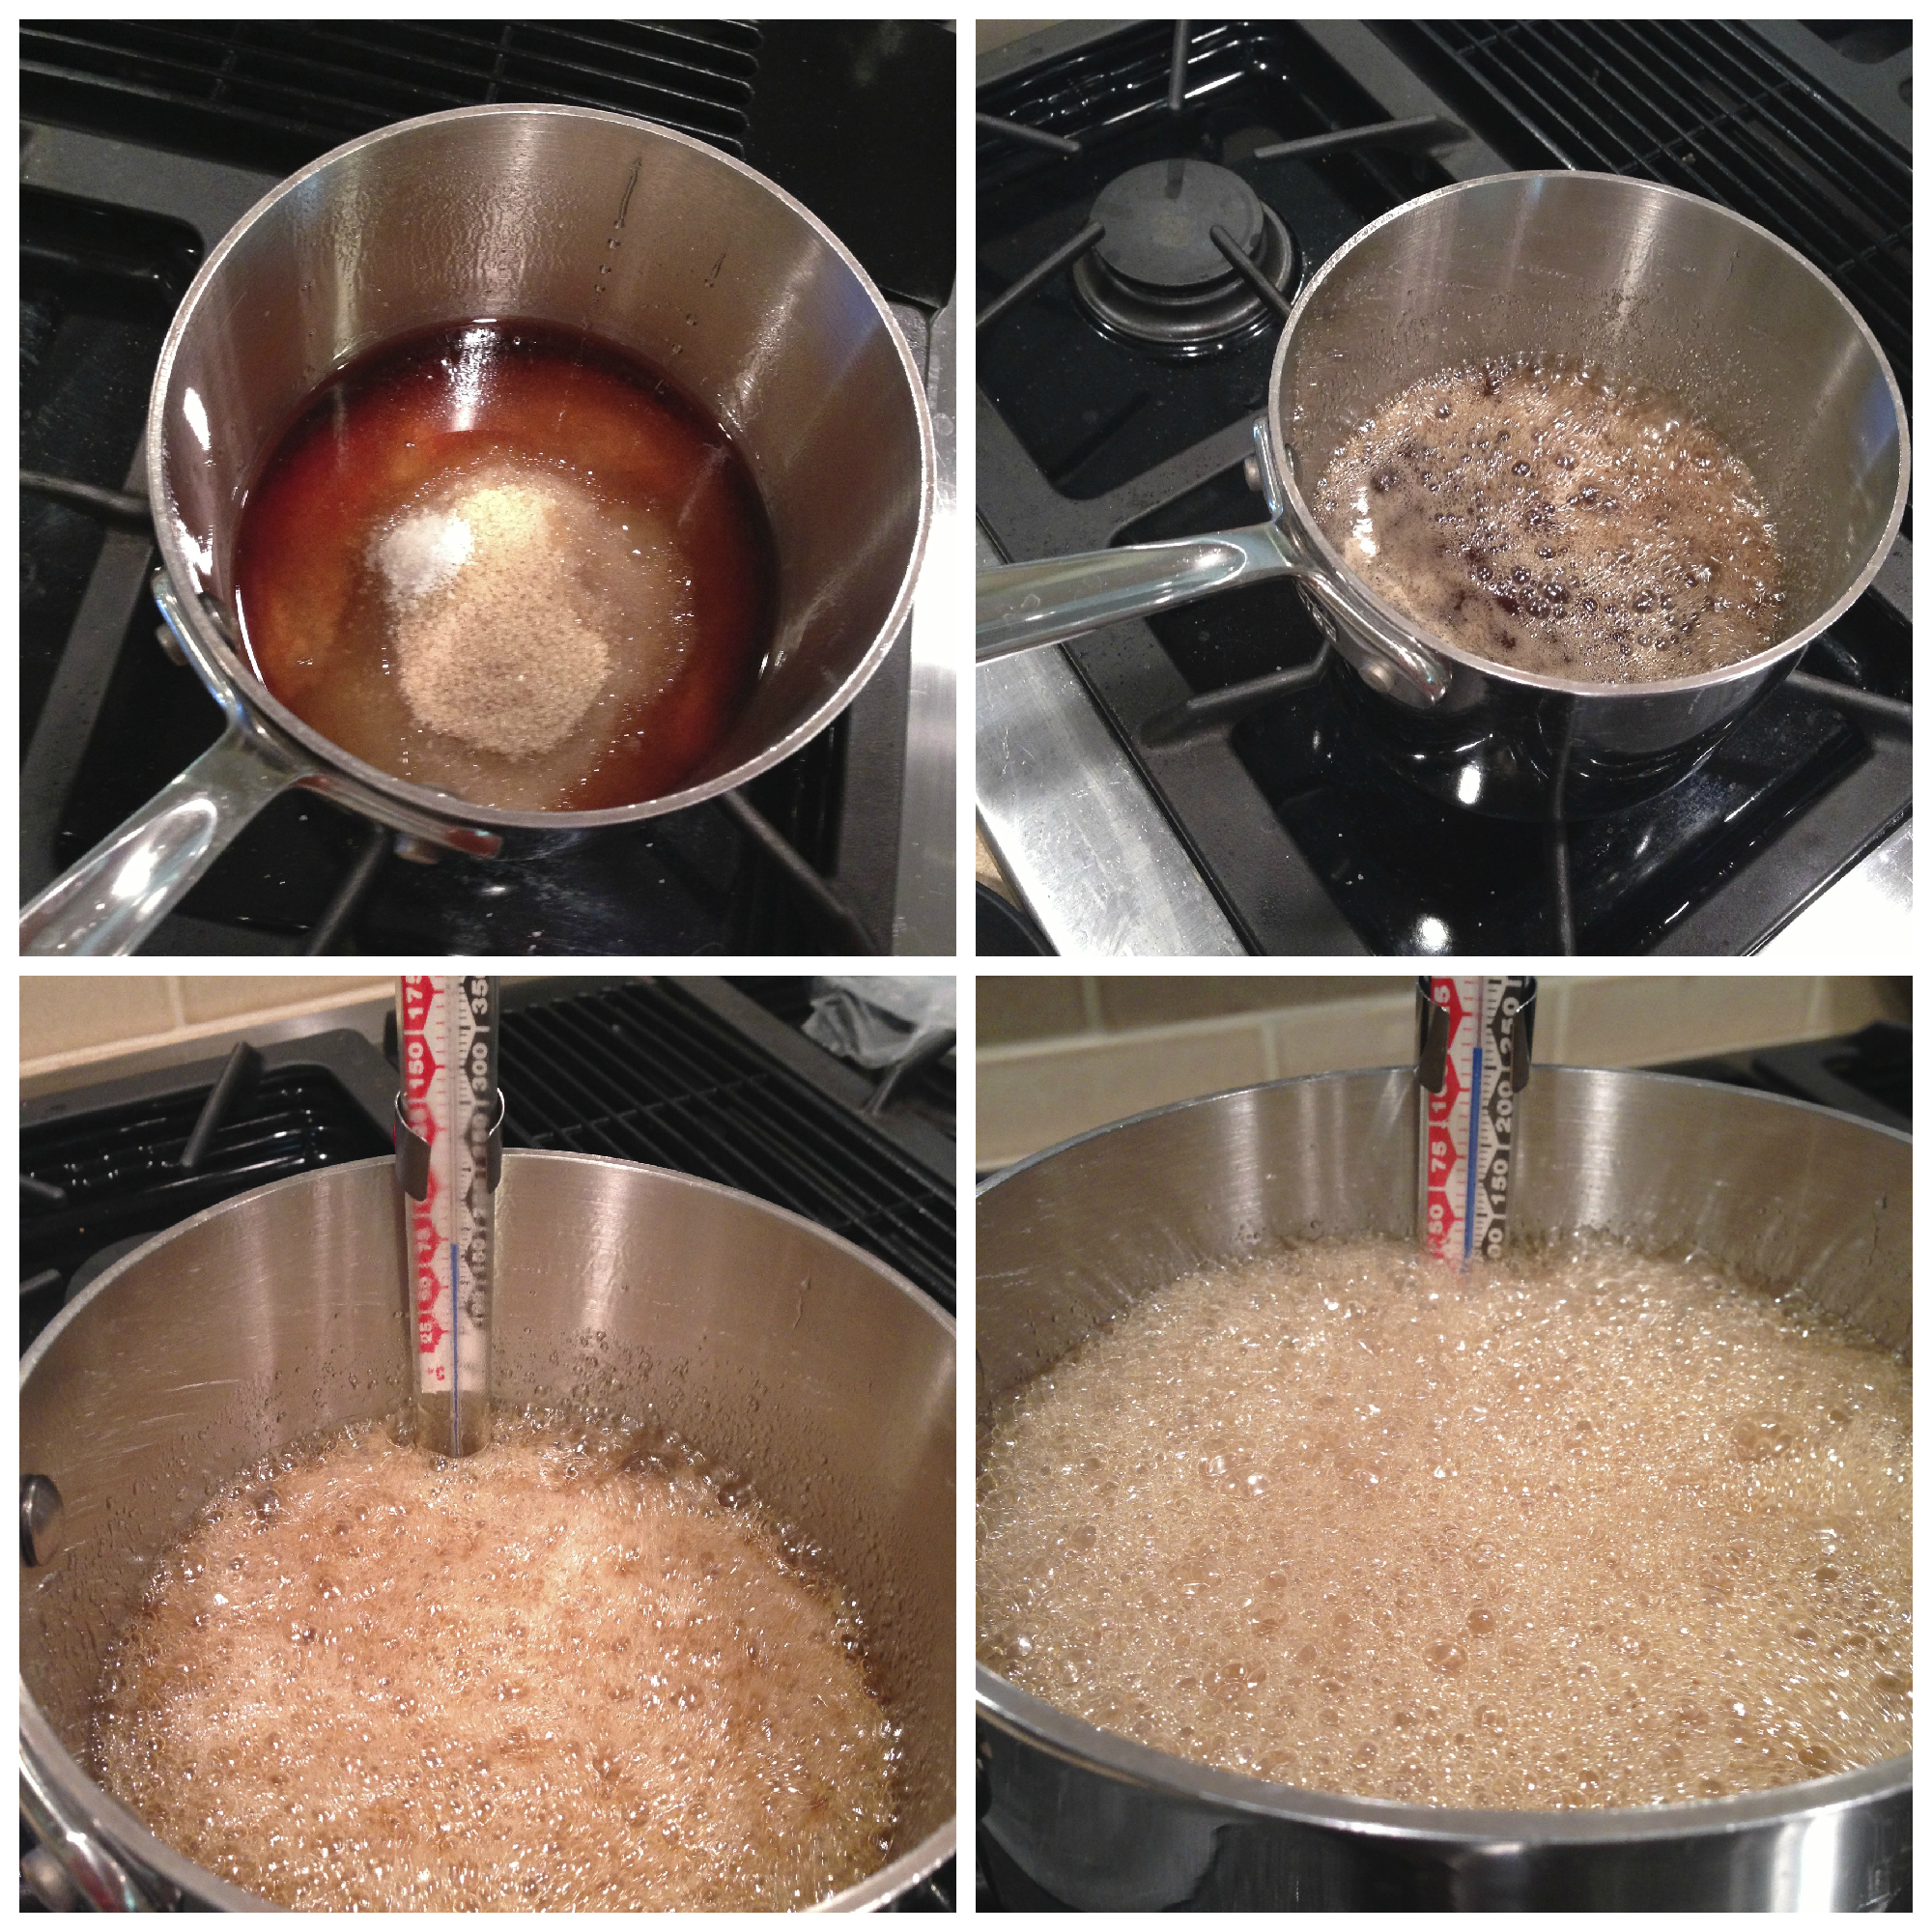
In a medium pot over low heat, combine the sugar, bourbon, corn syrup, agave nectar, and salt. Whisk until the sugar is dissolved, about 3-5 minutes, then turn the heat up to medium and bring the mixture up to a boil. Let it boil for 8-12 minutes, whisking every minute or do, and watch it carefully as it could easily bubble over. Clip a candy thermometer to the side of the pot and keep your eye on it — your end goal is 240 degrees F.
You’ll need beaten egg whites in the middle of the next step, so go ahead and beat them now until stiff peaks have formed and set them aside.
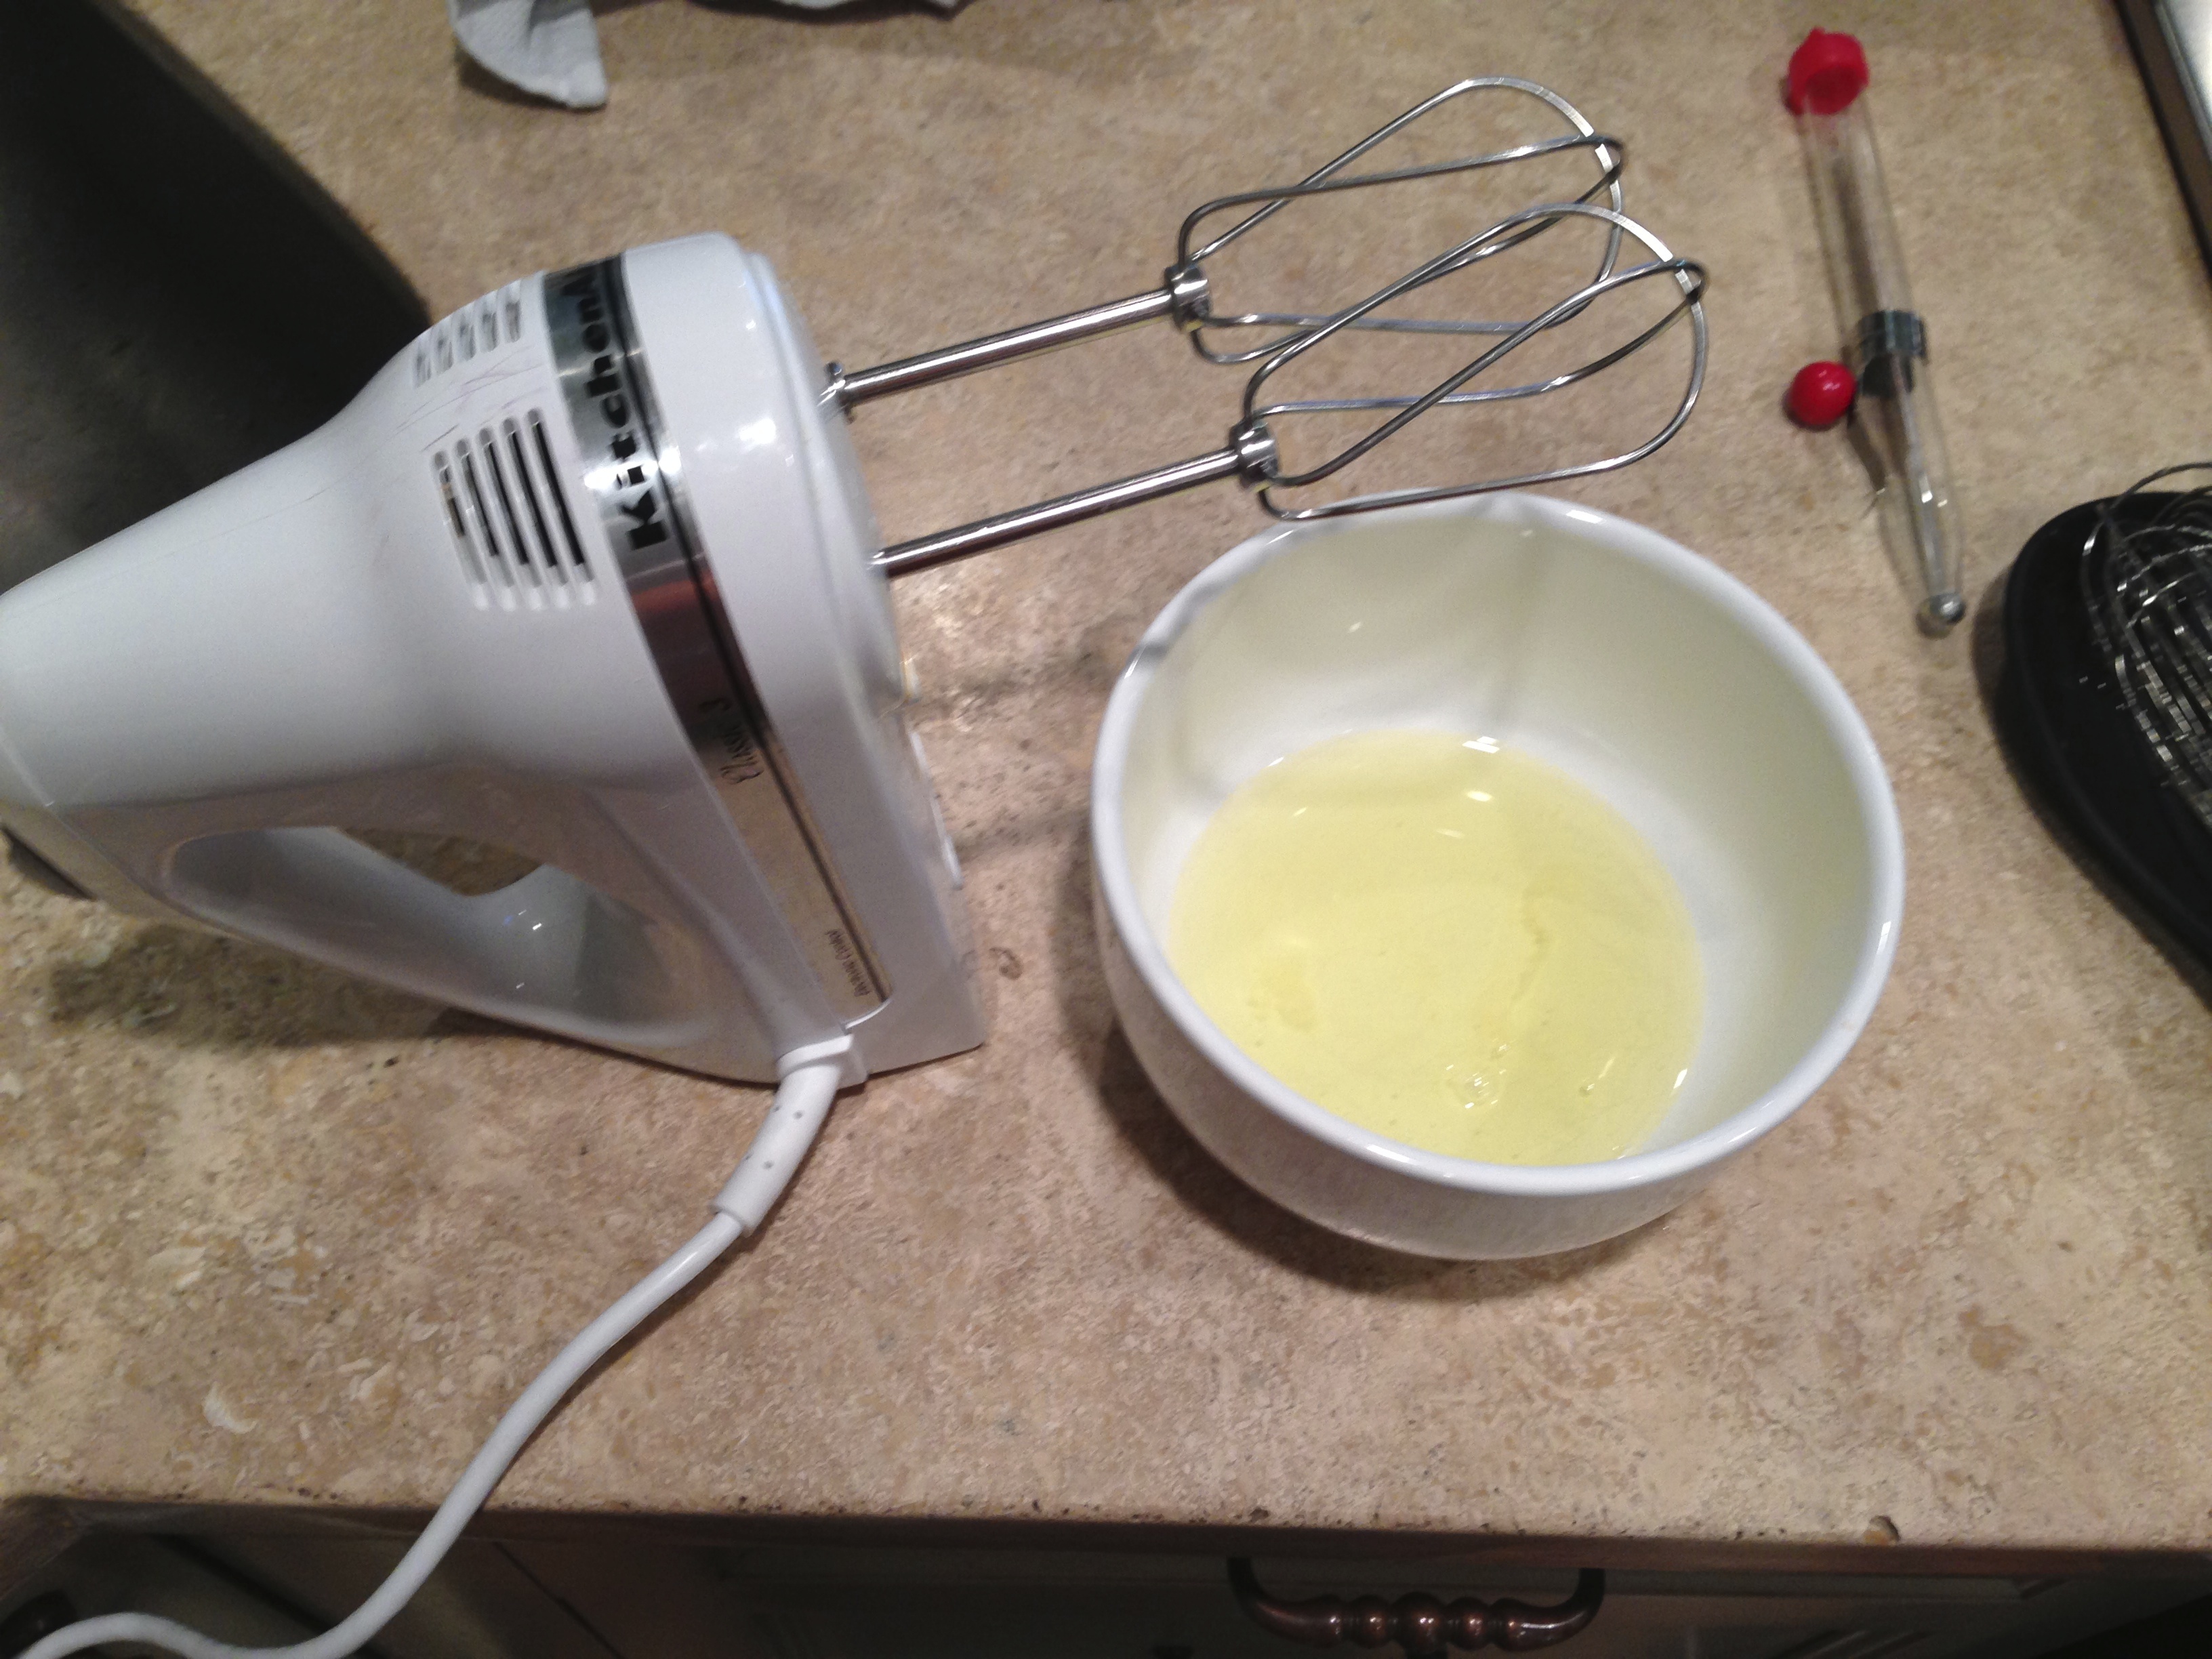
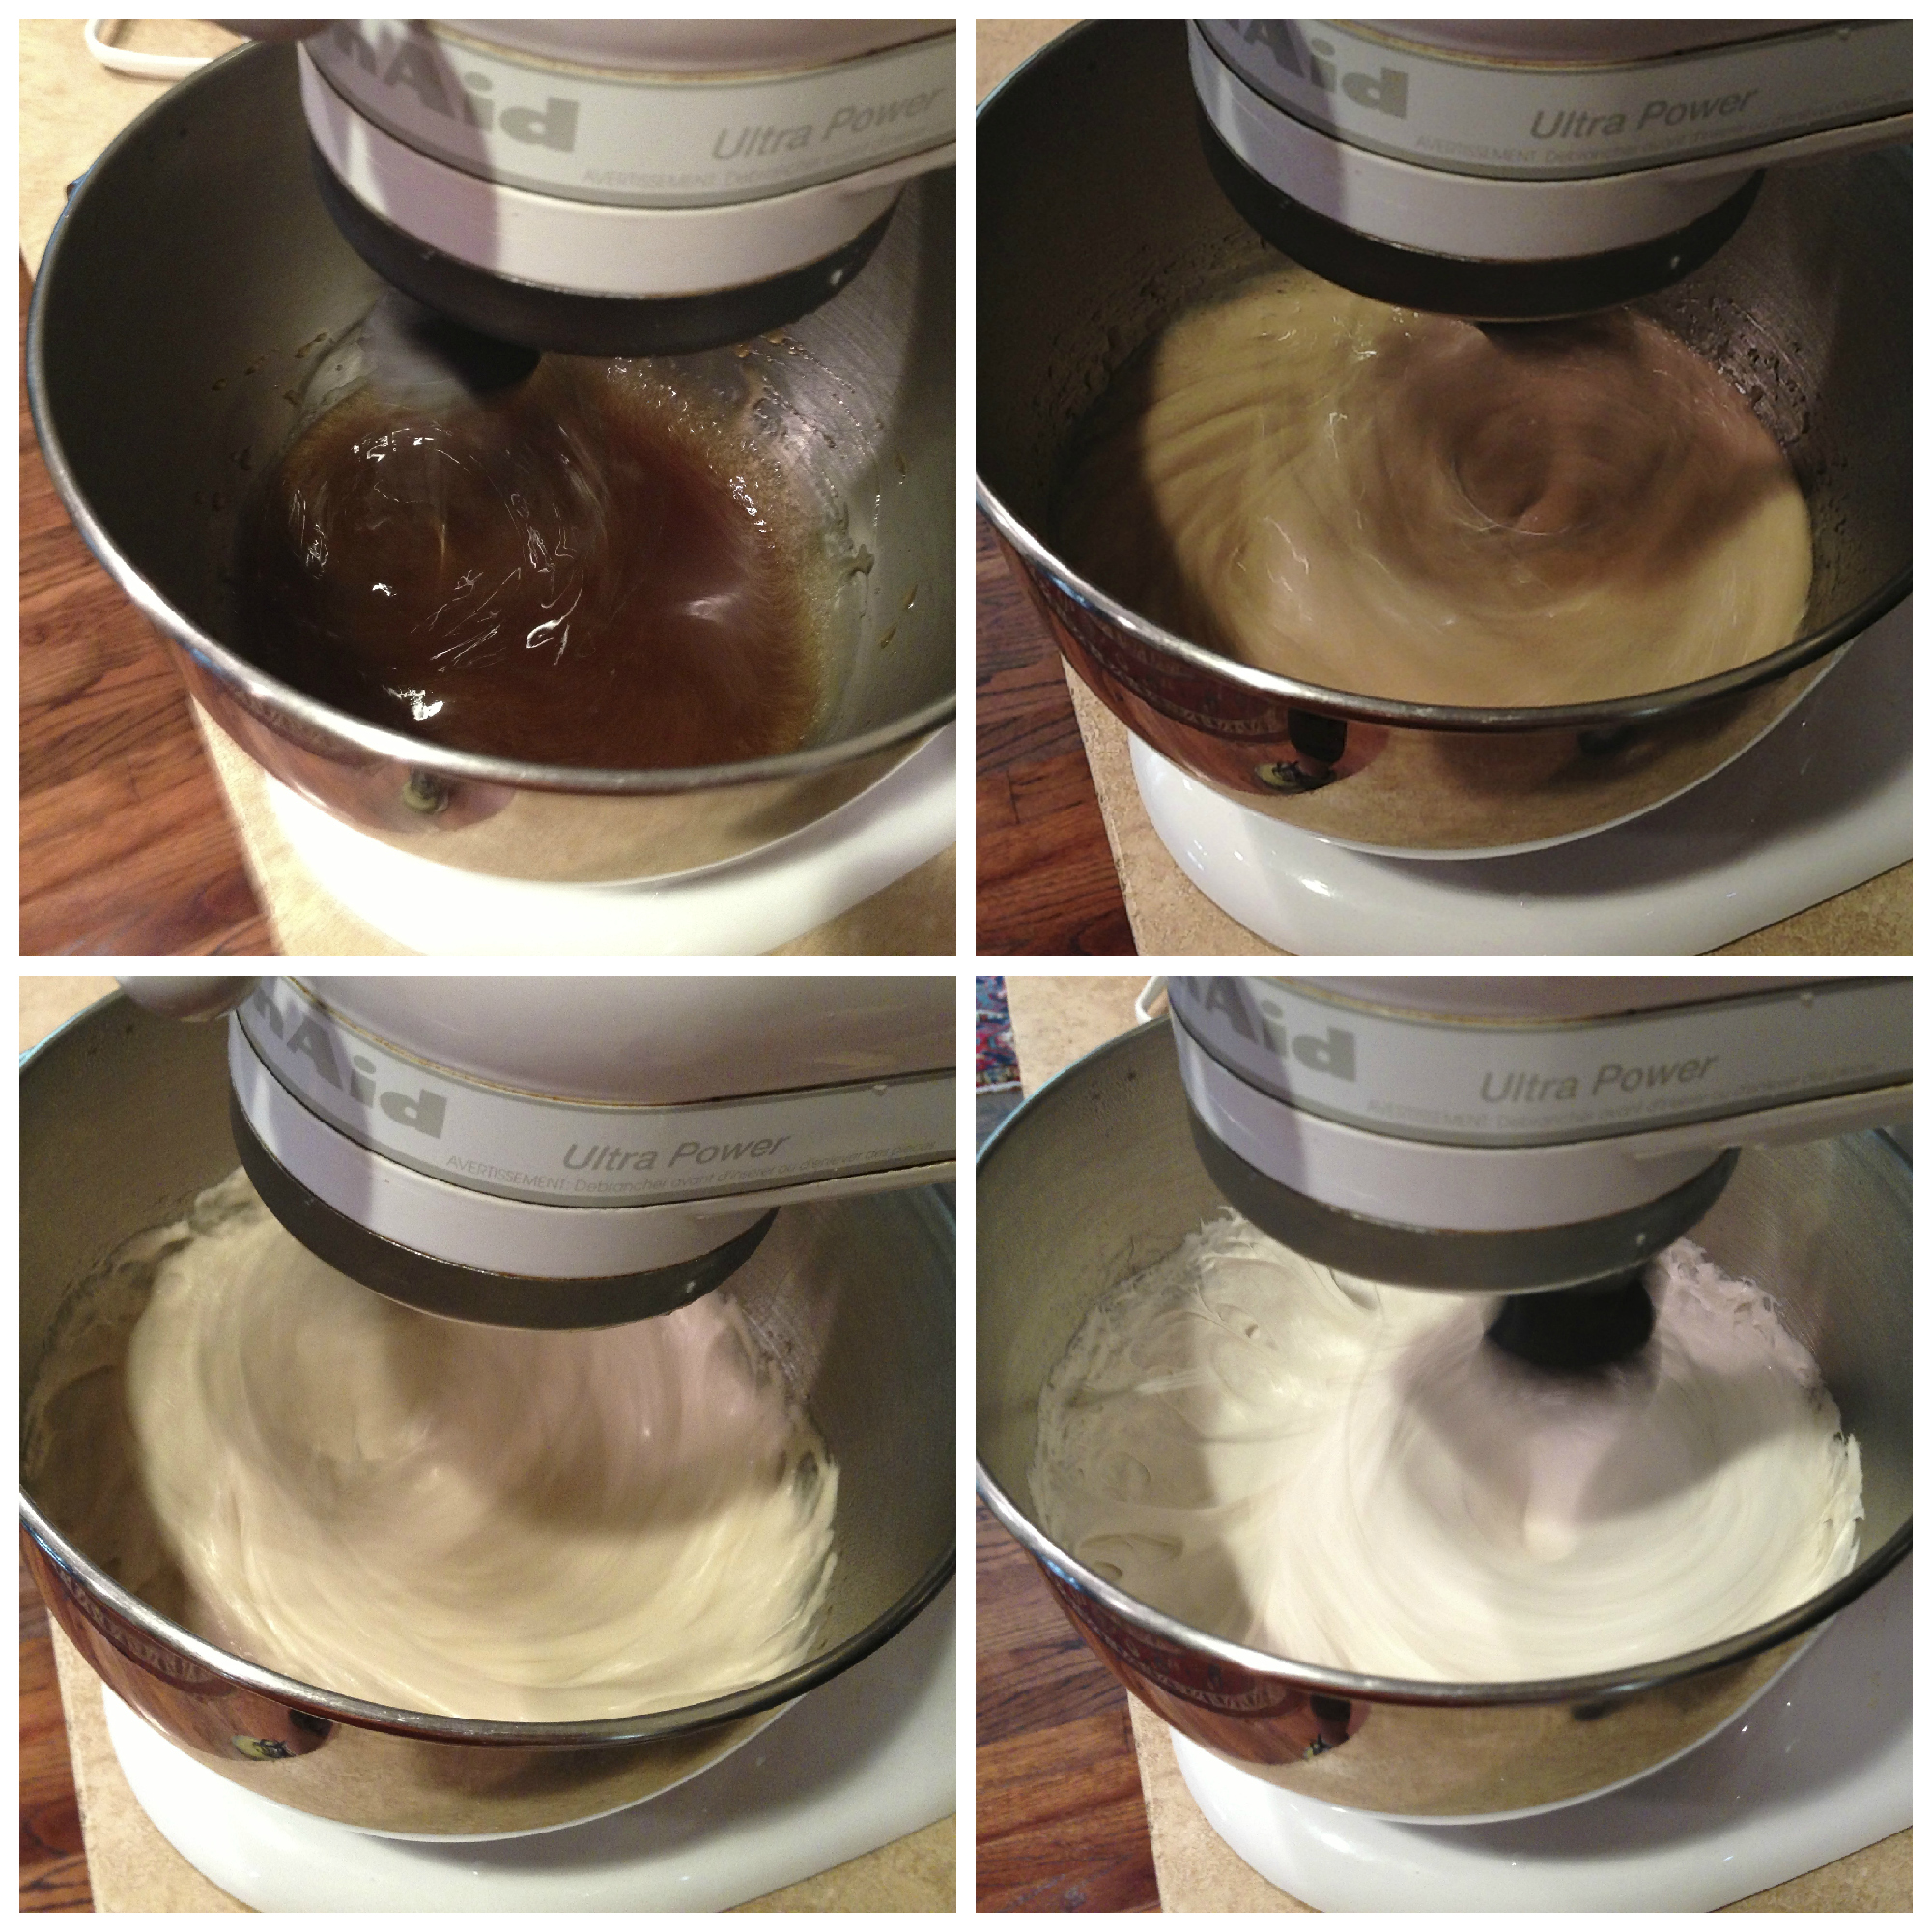
Once the sugar mixture reaches 240 degrees F, remove it from the heat and pour it in the mixer over the gelatin with the mixer on low speed. Crank up the speed to high, and it will turn from dark brown to a creamy white color over 6-8 minutes. When it is white and fluffy, add the beaten egg whites and vanilla to the sugar/gelatin mixture and beat again until just combined.
Pour the marshmallow batter into the coated 9″ x 13″ pan. If it does not all come out, which it probably won’t, spray a spatula with Pam and scrape the rest out. Then spray that spatula again and use it to smooth out the top. Sprinkle* powdered sugar on them and set them aside for 3-5 hours to become firm.
*Using a fine mesh strainer helps get the clumps out of the powdered sugar and creates a smoother layer of coating.
You can test their firmness by slightly pressing on the marshmallow to see if it bounces back. When they are ready, flip the pan over onto a cutting board and cut them into uniform sizes.

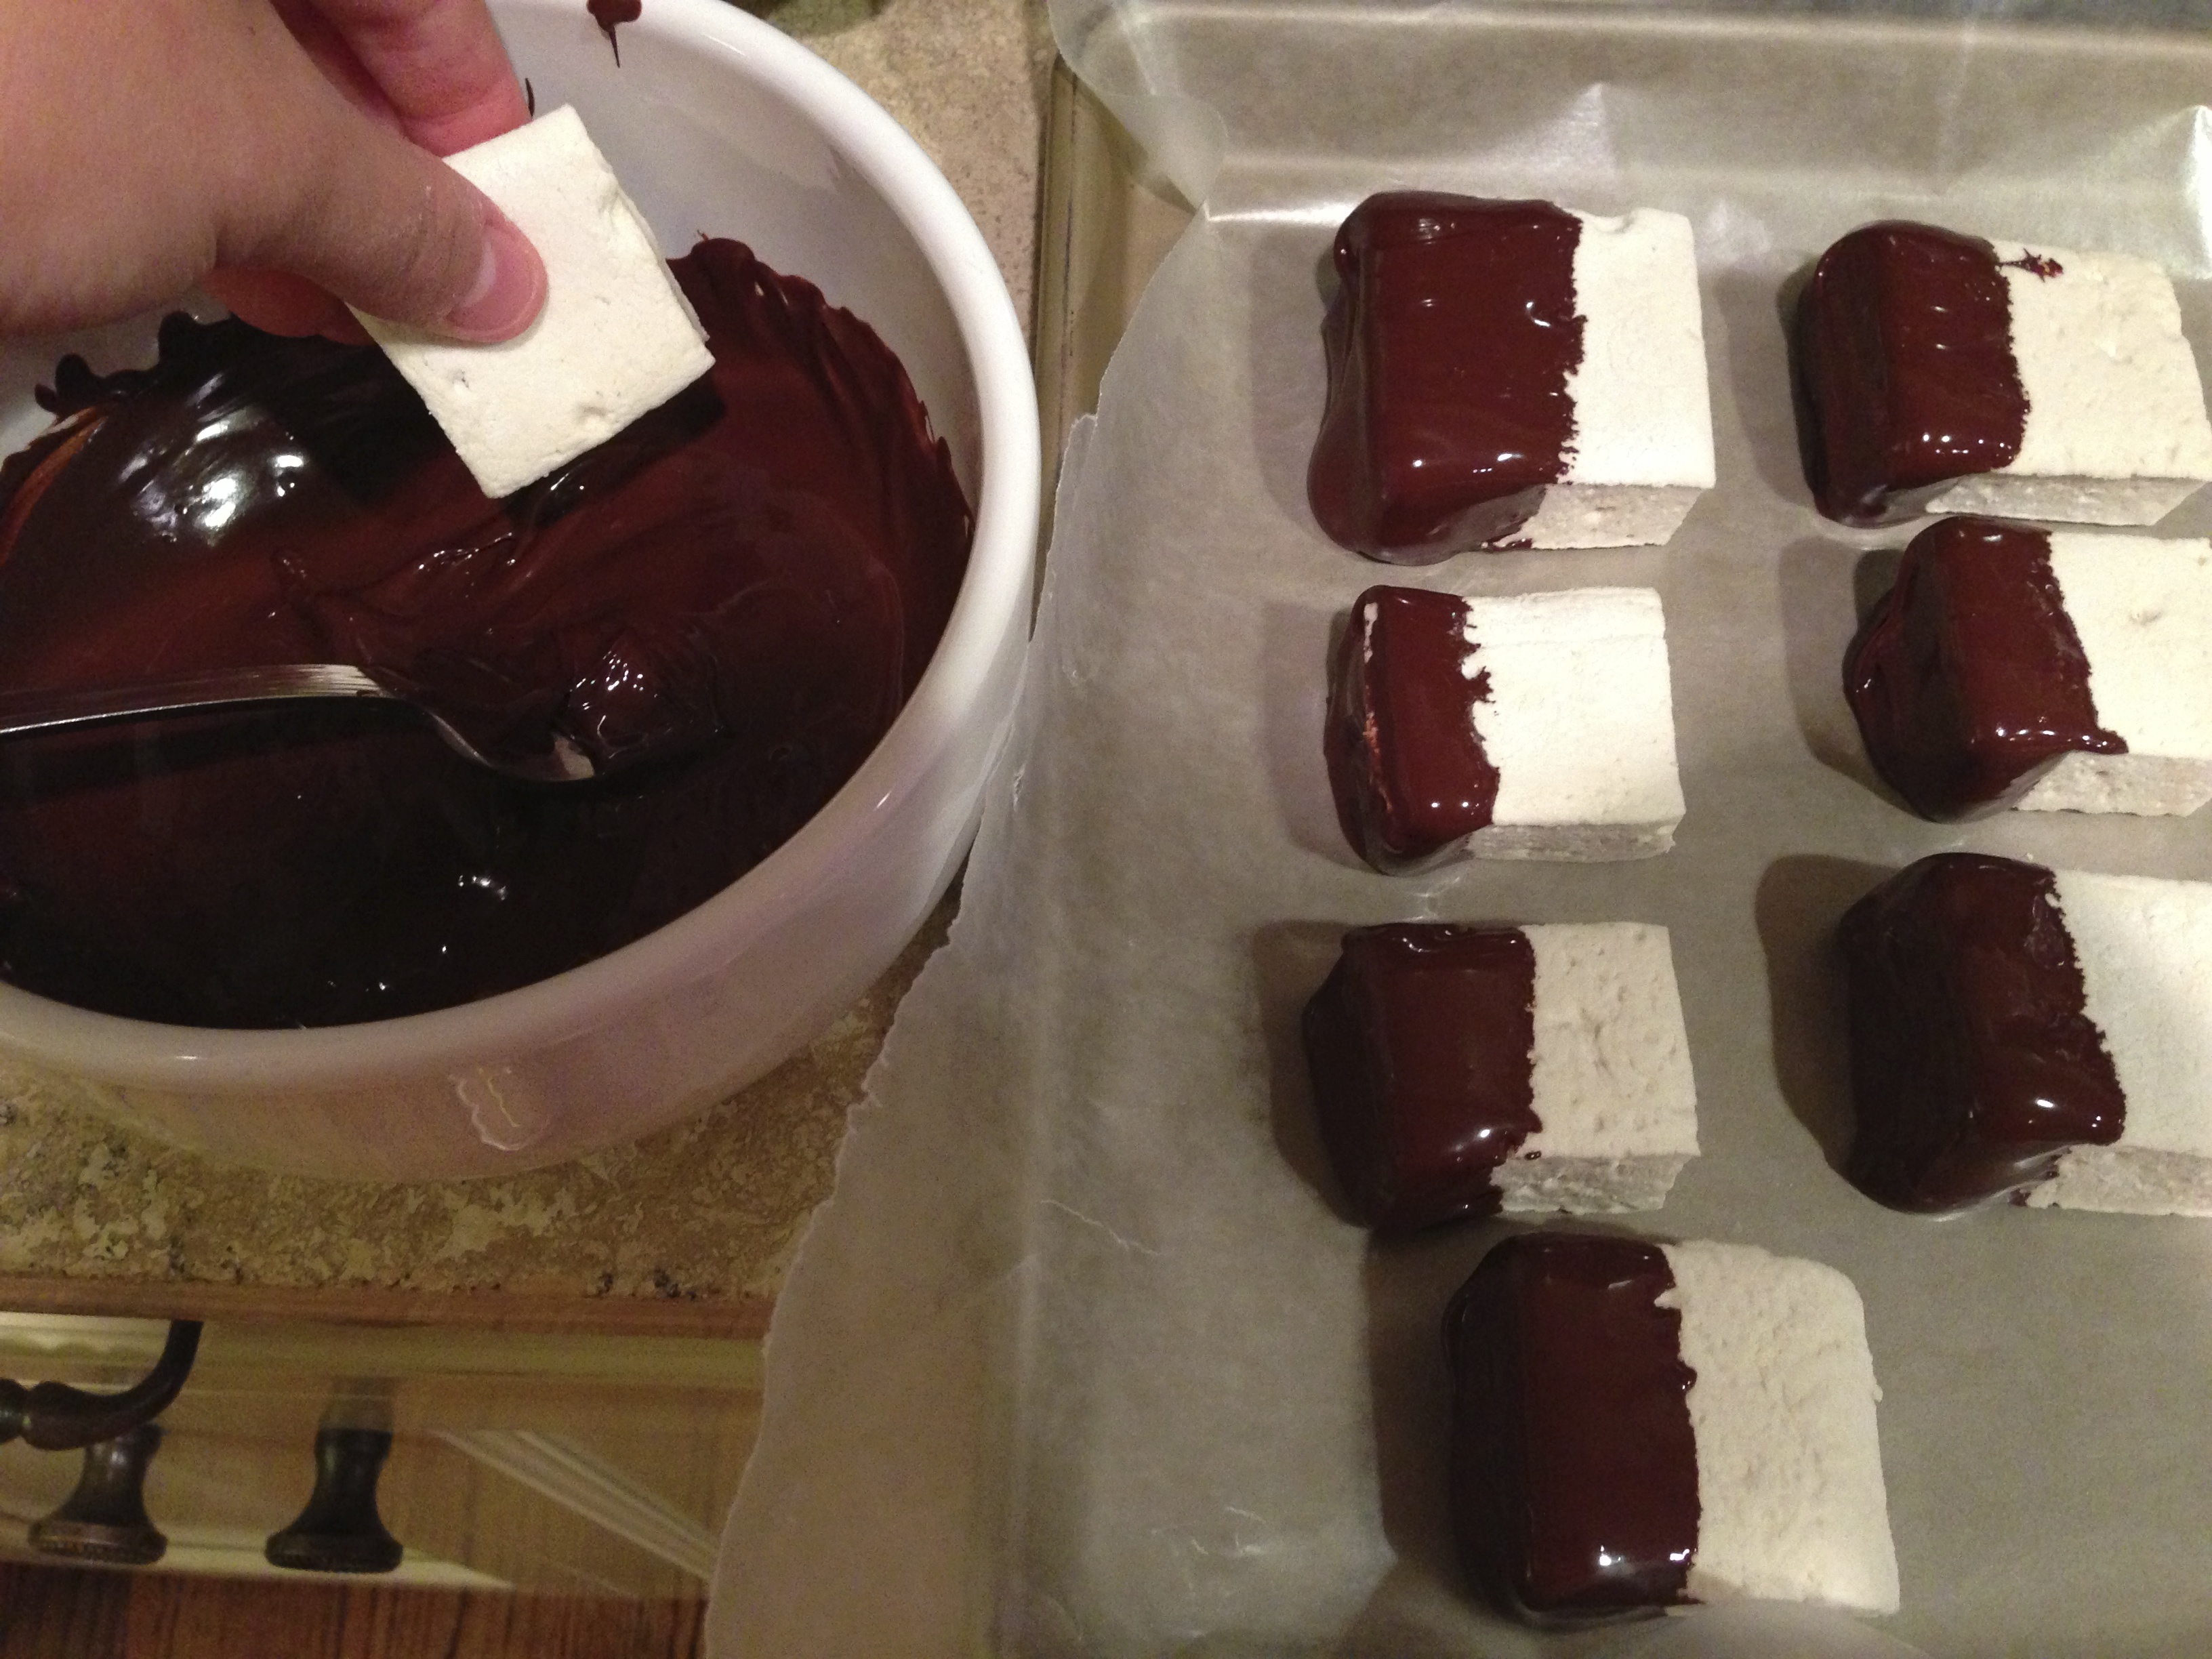
If you want to take them one step further, dark chocolate is the perfect compliment for the whisky. Melt a bag of good-quality dark chocolate chips in the microwave by heating for 20 second intervals and stirring well each time. It shouldn’t take more than a minute total. Drag each marshmallow through the chocolate then lay them on wax paper on a cookie sheet to firm up. You can stick them in the freezer to speed up this process if you’d like, but they won’t be as pretty.
Now…. what to do with them? S’mores? Hot chocolate? Snack?

Maker’s Mark Marshmallows
(adapted from Food52)
3 1/2 envelopes unflavored gelatin
1/2 c Maker’s Mark
1/2 c cold water
2 c granulated sugar
1/4 c light corn syrup
1/4 c agave syrup
1/4 tsp salt
2 egg whites
1 tbsp vanilla extract
Spray a 9 x 13 baking pan with Pam and dust it with powdered sugar until it is coated. Do this in your sink. It will be a hot mess no matter how careful you are. Set it aside.
In the bowl of a mixer, stir 1/2 cup cold water and 3 1/2 packs of gelatin together until it is just combined. Let it sit.
In a medium pot over low heat, combine the sugar, bourbon, corn syrup, agave nectar, and salt. Whisk until the sugar is dissolved, about 3-5 minutes, then turn the heat up to medium and bring the mixture up to a boil. Let it boil for 8-12 minutes, whisking every minute or do, and watch it carefully as it could easily bubble over. Clip a candy thermometer to the side of the pot and keep your eye on it — your end goal is 240 degrees F.
Beat two egg whites until stiff peaks have formed and set them aside.
Once the sugar mixture reaches 240 degrees F, remove it from the heat and pour it in the mixer over the gelatin with the mixer on low speed. Turn the speed up to high, and it will turn from dark brown to a creamy white color over 6-8 minutes. When it is white and fluffy, add the beaten egg whites and vanilla to the sugar/gelatin mixture and beat again until just combined.
Pour the marshmallow batter into the coated 9″ x 13″ pan. If it does not all come out, which it probably won’t, spray a spatula with Pam and scrape the rest out. Then spray that spatula again and use it to smooth out the top. Sprinkle powdered sugar on them and set them aside for 3-5 hours to become firm.
When they are ready, flip the pan over onto a cutting board and cut them into uniform sizes.
Optional:
Melt a bag of good-quality dark chocolate chips in the microwave by heating for 20 second intervals and stirring well each time. Drag each marshmallow through the chocolate then lay them on wax paper on a cookie sheet to firm up.
The marshmallows can be kept in an airtight container for 5-6 days.
puppy pork treats
 Sweet Harris’ canine cardiologist recently limited his salt intake because of his heart problems. The little dude has mitral valve prolapse so it’s sayonara to the ham jerky.
And the chicken salad.
And the filet mignon.
And the rotisserie chicken.
He’s pretty spoiled (imagine that) so he wasn’t interested when I offered him the dry, boring low-sodium dog treats meant for senior dogs. I felt badly but didn’t really see another option.
Thank goodness for my mom.
She couldn’t stand the idea of Harris living without good treats so she made him some out of pork tenderloin, which was perfect because it is a lean cut of meat.
Even if your dog doesn’t have heart problems, I’m sure he or she wouldn’t mind these pork treats!
To make them, slice a pork tenderloin as thinly as possible. Lay the slices on a cookie cooling rack that’s been set on a cookie sheet. Bake at 160 degrees F for two hours, then flip each slice of meat and bake for another hour.
Store in an airtight container in the refrigerator for up to two weeks.
 Harris could hardly contain himself when Whit offered him the first bite!
 Here he is begging with Emmy Lou and my parents’ pups.
blueberry pie

There’s nothing that signals summer to me quite like an early evening spent in the pool followed by dinner on the grill and a fruit pie in the oven. Even better when it’s spent surrounded by dear family.
Last week we had one of those evenings. It was perfect. It made me wish I had more of them, but I’m grateful for those moments.
Just like that evening, this pie is rooted in family too. It’s my grandmother’s recipe. And it’s so simple that I turn to it over and over again for a great dessert.

Blueberry Pie
1 unbaked pie crust
2 pints blueberries
1/2 c butter, softened
1 c sugar
3/4 c flour
1 egg
1 tbsp. vanilla
Grease a pie dish and place the unbaked pie crust in it. Trim the edges. Full the shell with the berries.
In a medium bowl, beat the butter until it is lighter in color then add the sugar. Beat until combined. Slowly incorporate the flour, egg and vanilla. The consistency will be like sugar cookie dough.
Press the batter into an even layer on the top of the blueberries. Bake at 350 degrees F for 1 hour. Cool for 10 minutes before serving.
avocado toast

Introducing: my favorite snack ever. Also, an amazing breakfast.
Avocado toast.
Its so creamy and decadent that it feels like it should be bad for you. But its not! In moderation. But even moderation is only good in moderation. (Name that writer.)
So go ahead and have a second slice.
Its a joke how easy this is to put together. And once you’ve had it once, you’ll find yourself reaching for it again and again.
I just have two tips: use a really good, seedy bread (like Whole Foods Seeduction Bread) and toast it until the outside is crunchy, stopping right before it is dark brown. You’ll want the bread to be able to hold up to the soft avocado.
My third tip would be to keep ripe avocados around your house, but I assume you are all already doing that. Right???
Avocado Toast
avocados
whole-grain, seeded bread (or whatever kind you like)
salt
pepper
optional: olive oil, poached egg, lime, tomatoes, goat cheese, etc.
In a small bowl, use a fork to mash 1/2 avocado for every piece of toast you want to make. Toast the bread until it is crispy, but not too dark. Spread the mashed avocado over the toast and sprinkle with salt and pepper.
You could top it with a poached egg or sliced tomato or a spritz of lime or a smear of goat cheese or a drizzle of olive oil. Really, the possibilities are endless.
smoky beef chili

Chili is Texan. Through and through. It has Mexican roots, but was created in San Antonio.
Daniel Boulud is French. He has restaurants all over the world now, but he’s a Frenchman.
So its a little weird that my new favorite chili recipe was created by him. A Frenchie nailing Tex-Mex.
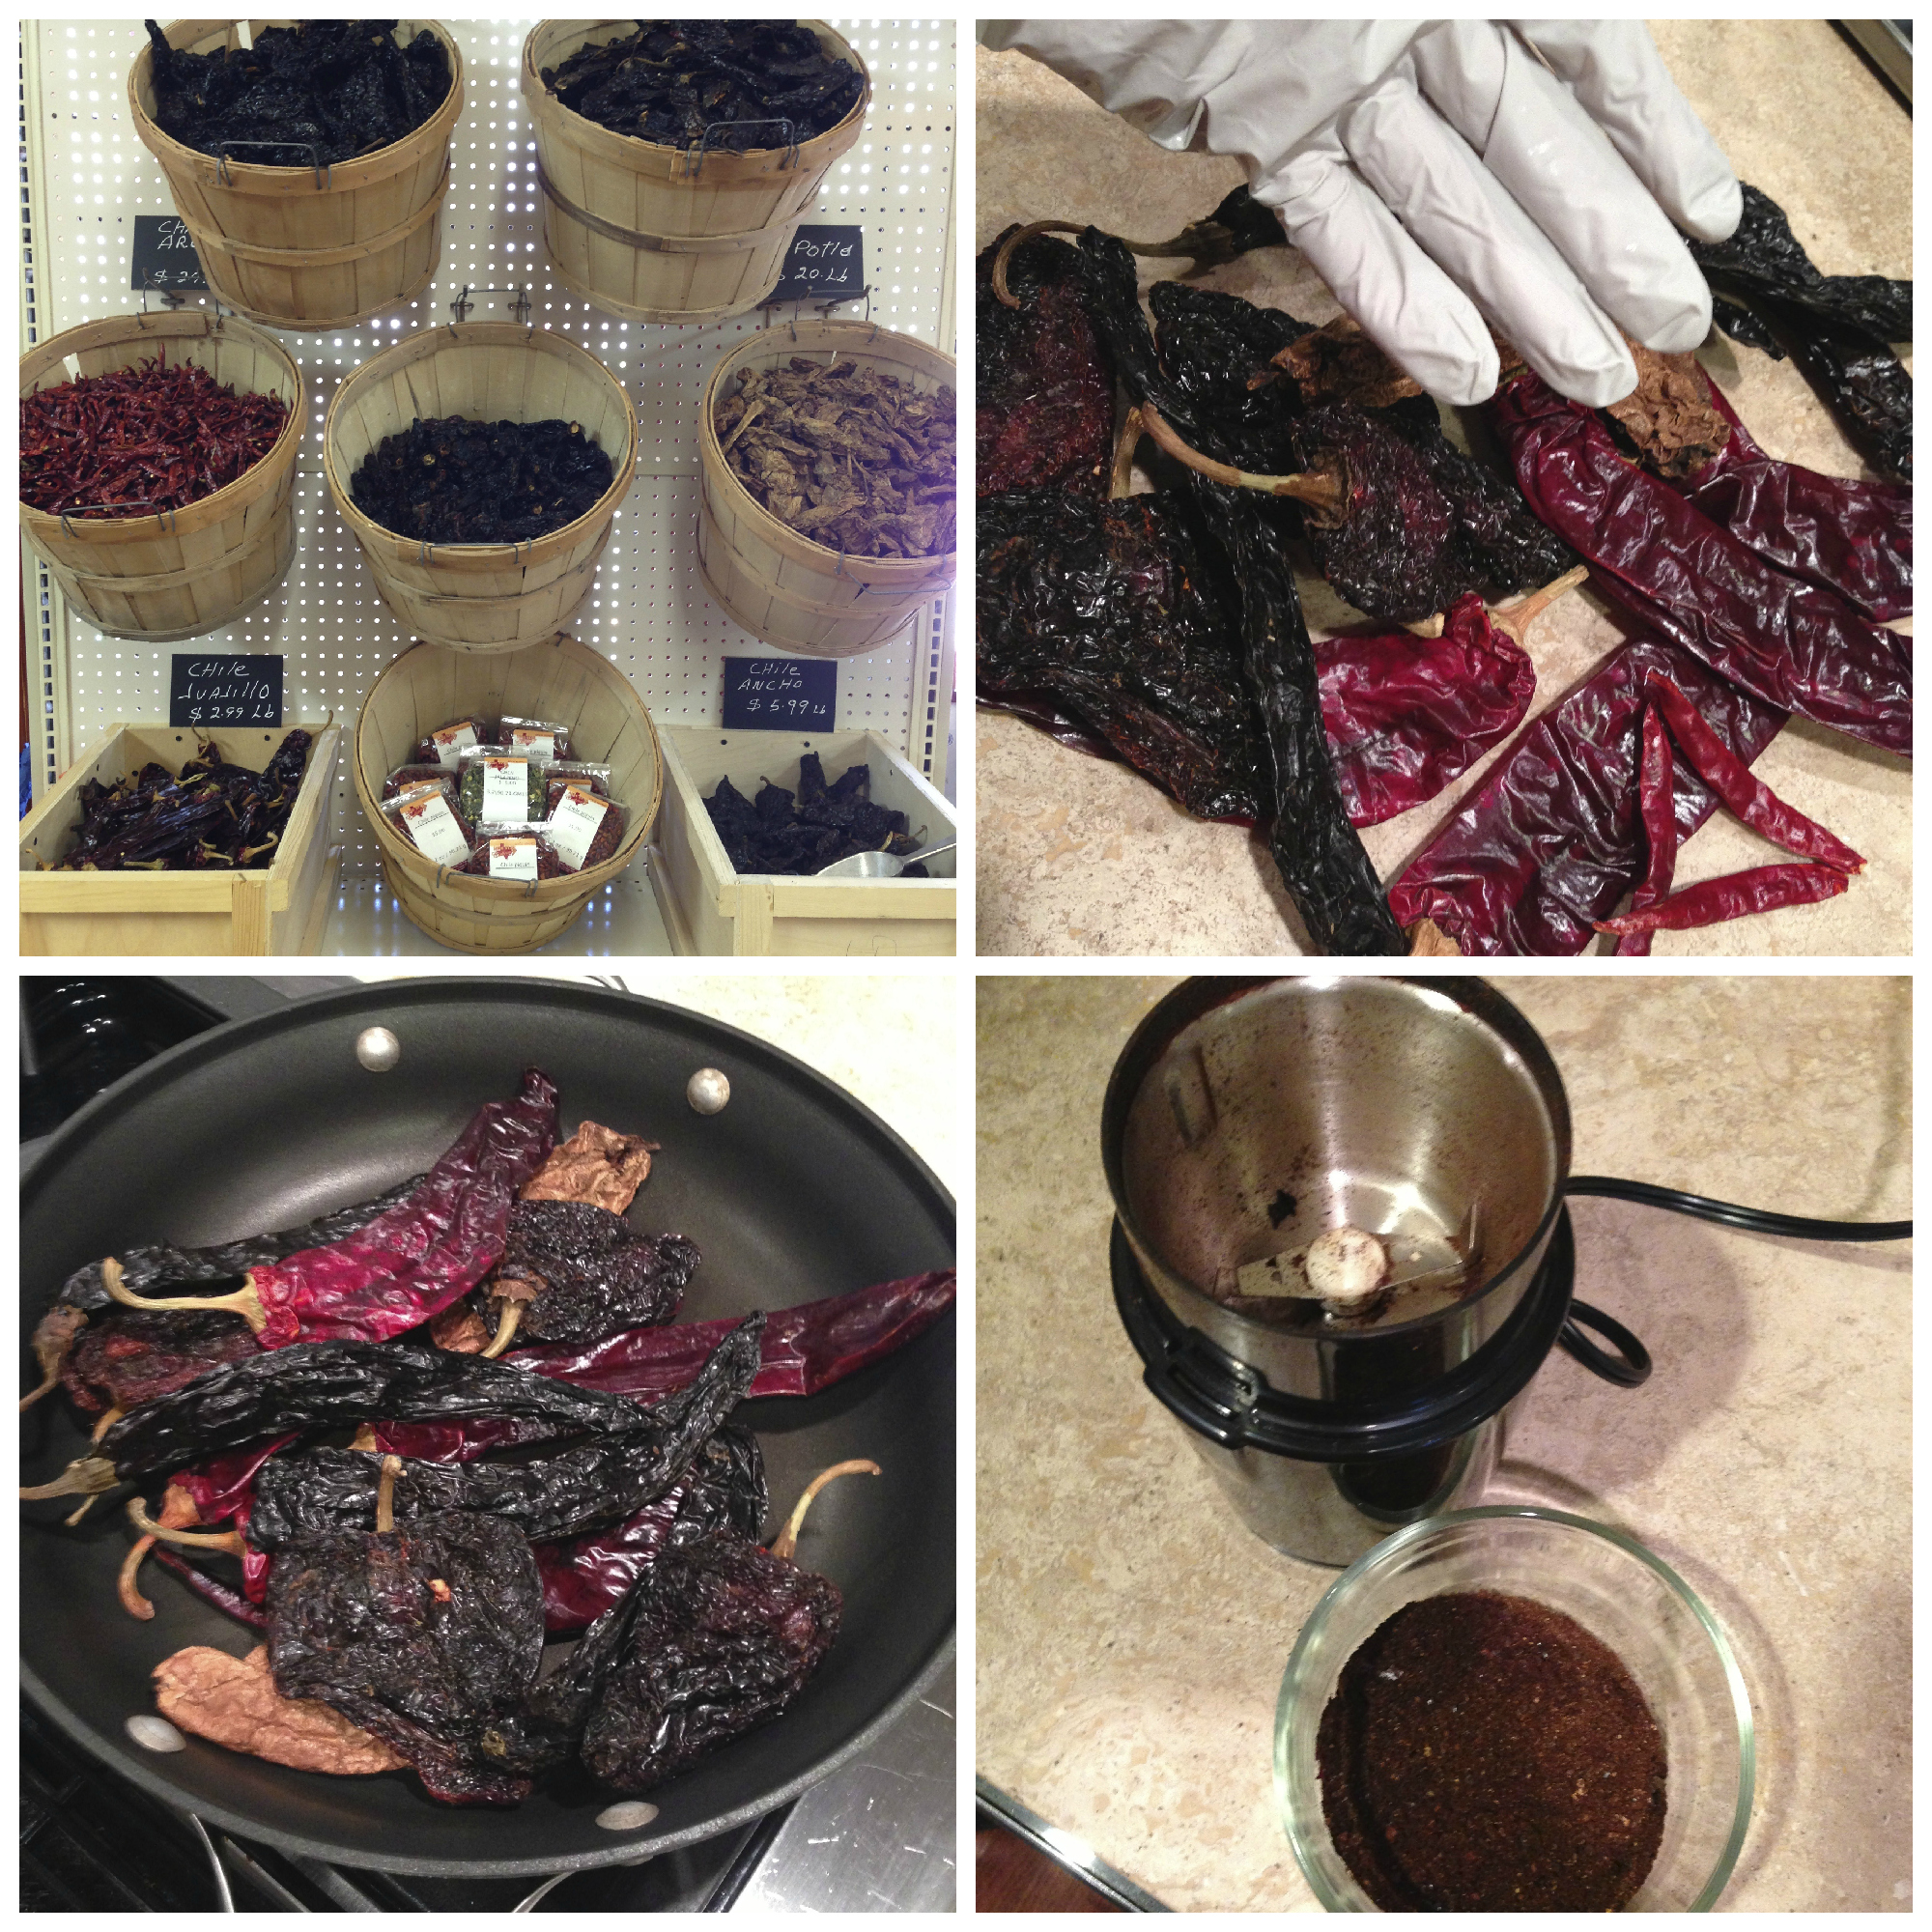
The homemade chile powder gives this chili its depth and layered flavor. It can be a very slight pain to track down all of the different types of dried chiles, but the end result will blow you away. Find the international grocery store in your town and they’re sure to have them.
And here’s what you do with them: In a dry skillet over medium heat, toast the chiles for 7-8 minutes, shaking the skillet every few minutes to prevent them from burning. Then remove the skillet from the heat and let cool.
Once they have completely cooled (you don’t want them to steam while you are grinding them), discard the stems and seeds and then use a spice grinder to pulverize them into a powder. You probably cannot do them all at once (unless you have an industrial grinder) so just do a few at a time.
Wear gloves while you’re doing this or you’ll rue the day you made this chili when you try to take out your contacts later.
Also, don’t do this in your husband’s fancy coffee bean grinder. He will kill you.
Buy a cheap spice grinder at Bed Bath & Beyond. Then label the crap out of it as a ‘chile grinder’ because you will never get the residual spice off of it. Anything else you put in it will end up tasting red hot.
Zest and then juice the limes into a bowl. Add the masa harina and 3 cups of water. Combine and set aside. When this is added to the chili, the masa harina helps thicken it and the lime really brightens up the flavor.
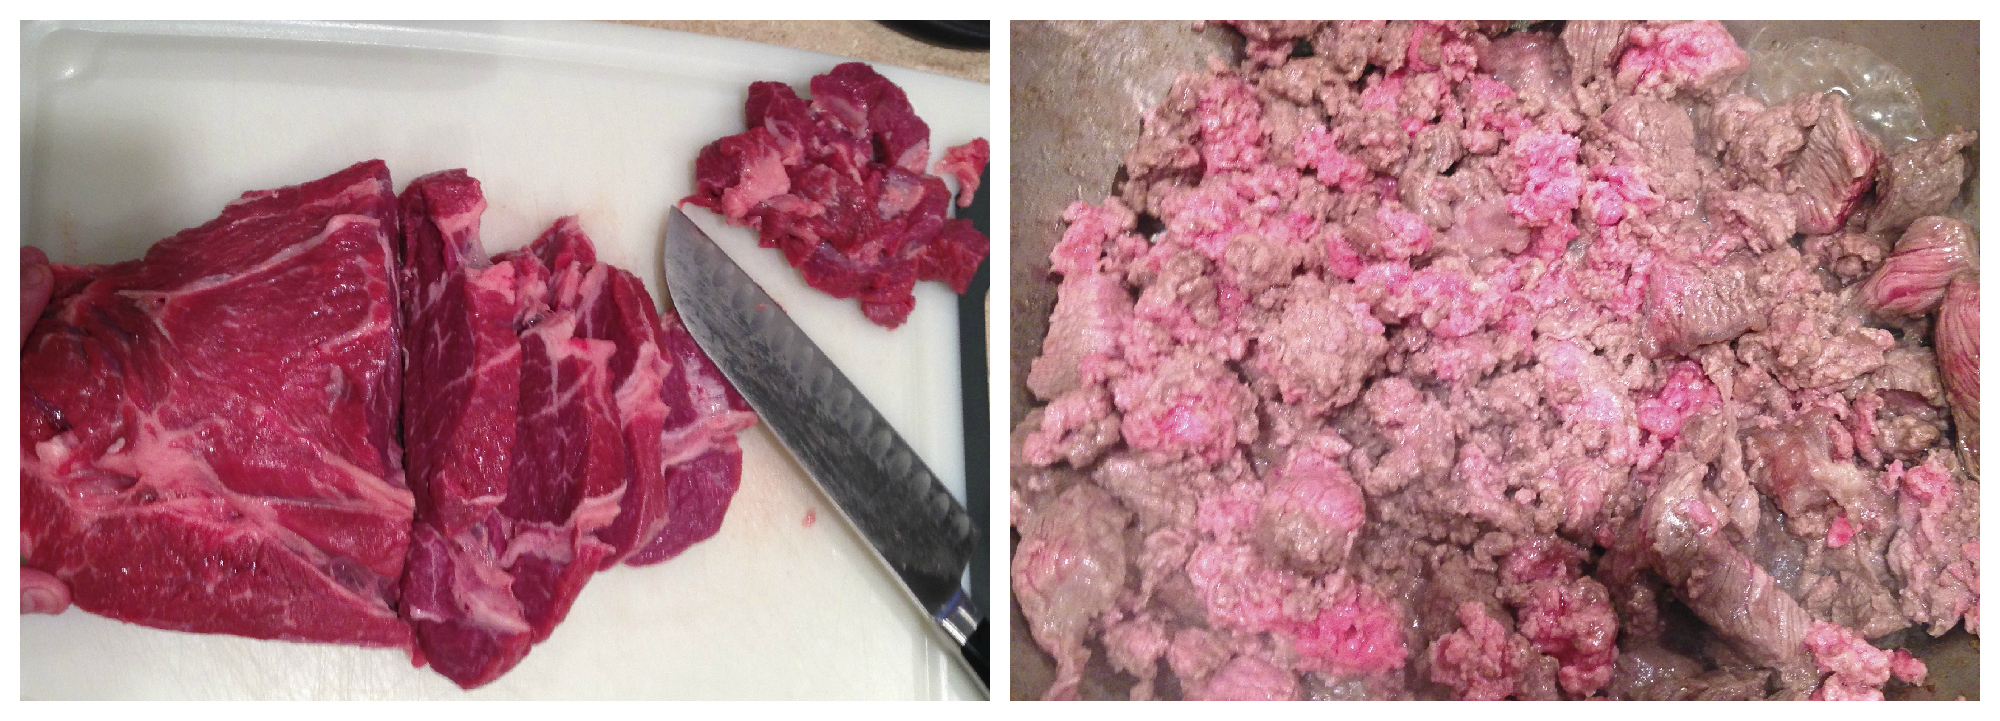
In a Dutch oven over high heat, add the beef cubes and sear until golden brown on all sides, 10 to 12 minutes. Remove the beef cubes to a plate and repeat the process with the ground meat. These are fatty cuts of meat, so if too much liquid accumulates in the bottom of the pan around the meat, pour it out or the meat won’t sear. Remove the ground meat to a plate.
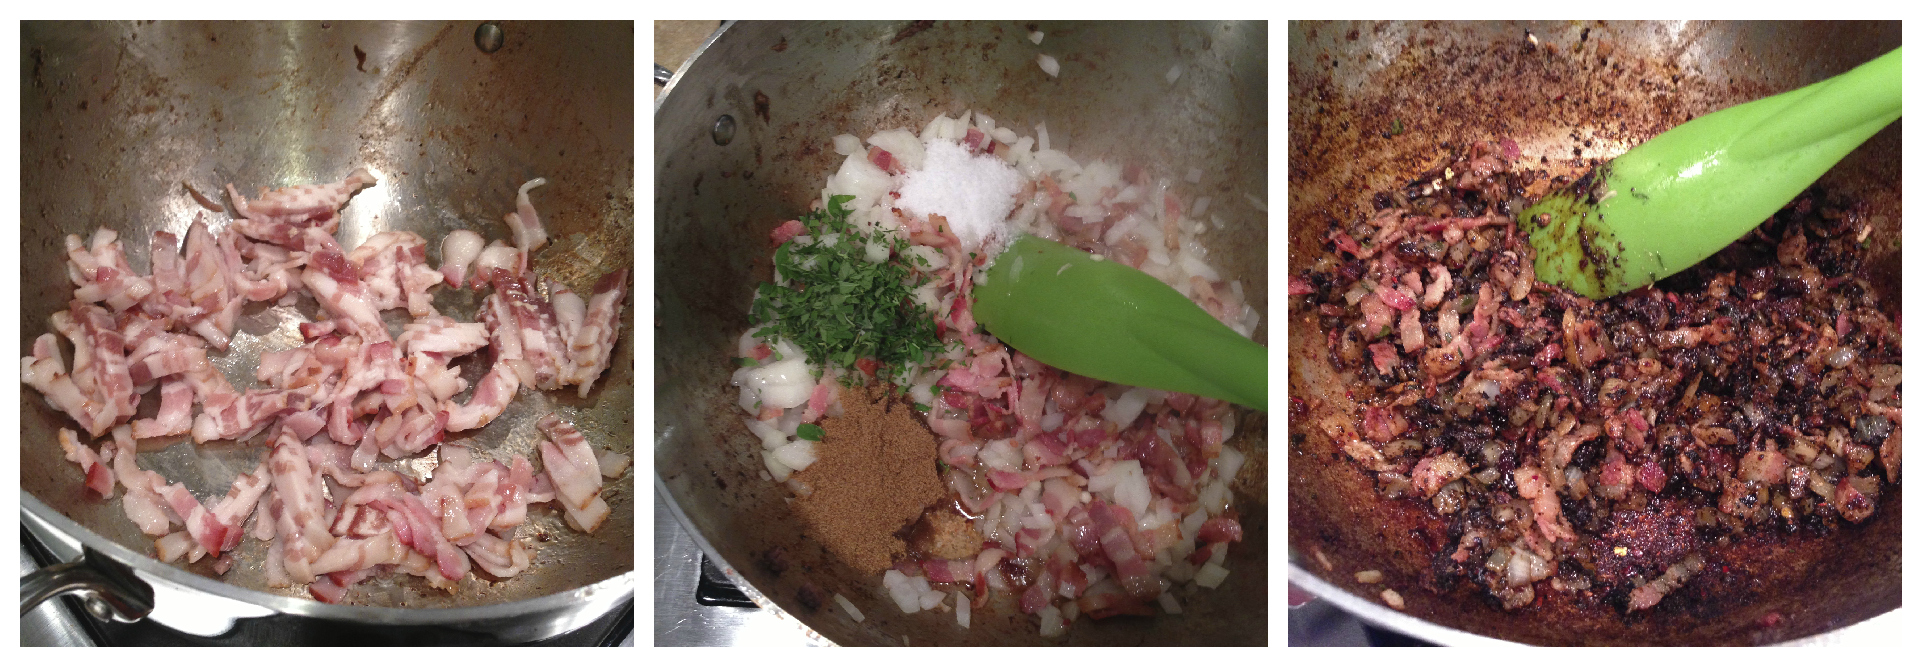
In the same pot, lower the temperature to medium-high and add the bacon. Cook until right before it becomes crispy, about 6-7 minutes. Then add the onion, cumin, oregano, and salt and cook until the onions are softened, 10 to 12 minutes. Add the garlic and cook for 2 more minutes. Stir in 1/3 c of the homemade chile powder and cook for 2 more minutes. Stir in the vinegar and Worcestershire sauce and scrape up any browned bits stuck to the bottom of the pot.
Return the beef to the pot and add the tomatoes, bay leaf, and masa harina mixture. As you are adding the tomatoes from the can, squeeze (carefully! or juice will squirt out at you) each one until it breaks up slightly. You don’t want whole tomatoes. Also add the juice from the can. Bring the whole mixture to a simmer.
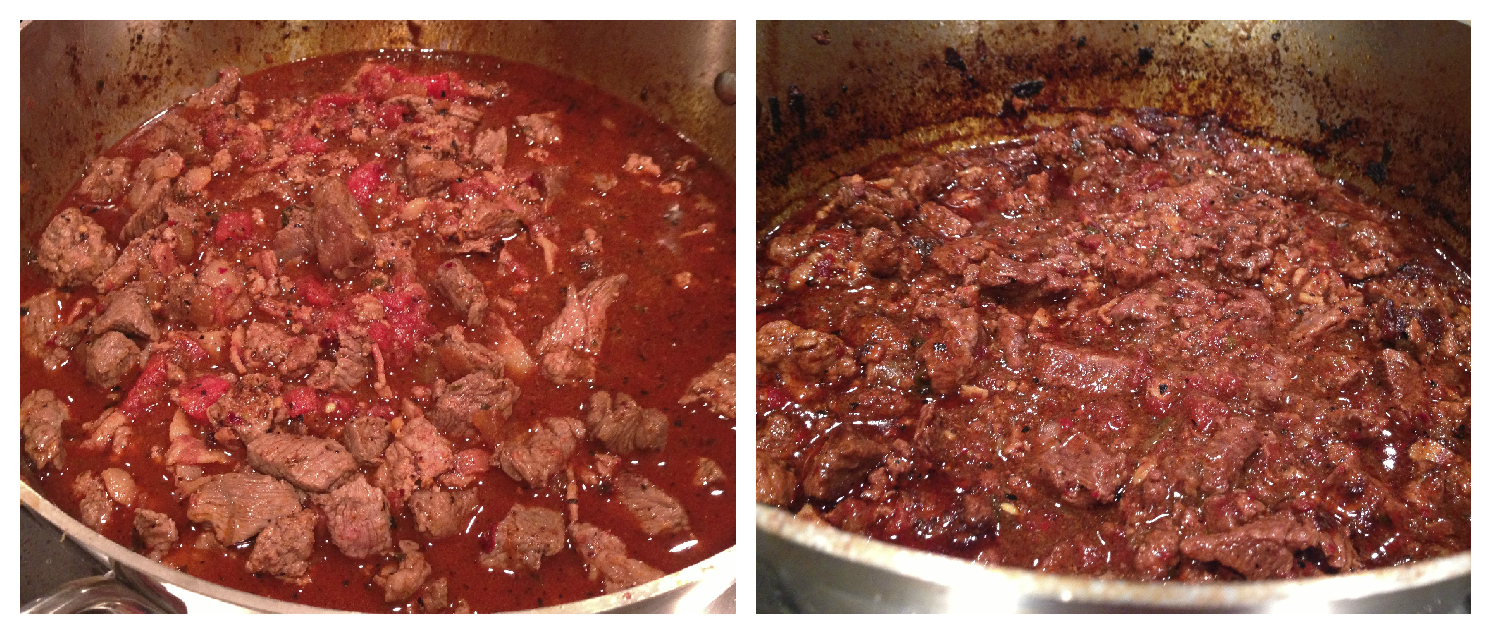
Cover the pot and transfer it to a 300 degree F oven for 2 hours, stirring halfway through. Remove the lid and cook for another 45 minutes – 1 hour, or until it is thickened to your liking. Serve with grated cheddar, tortilla chips, sour cream and avocados.
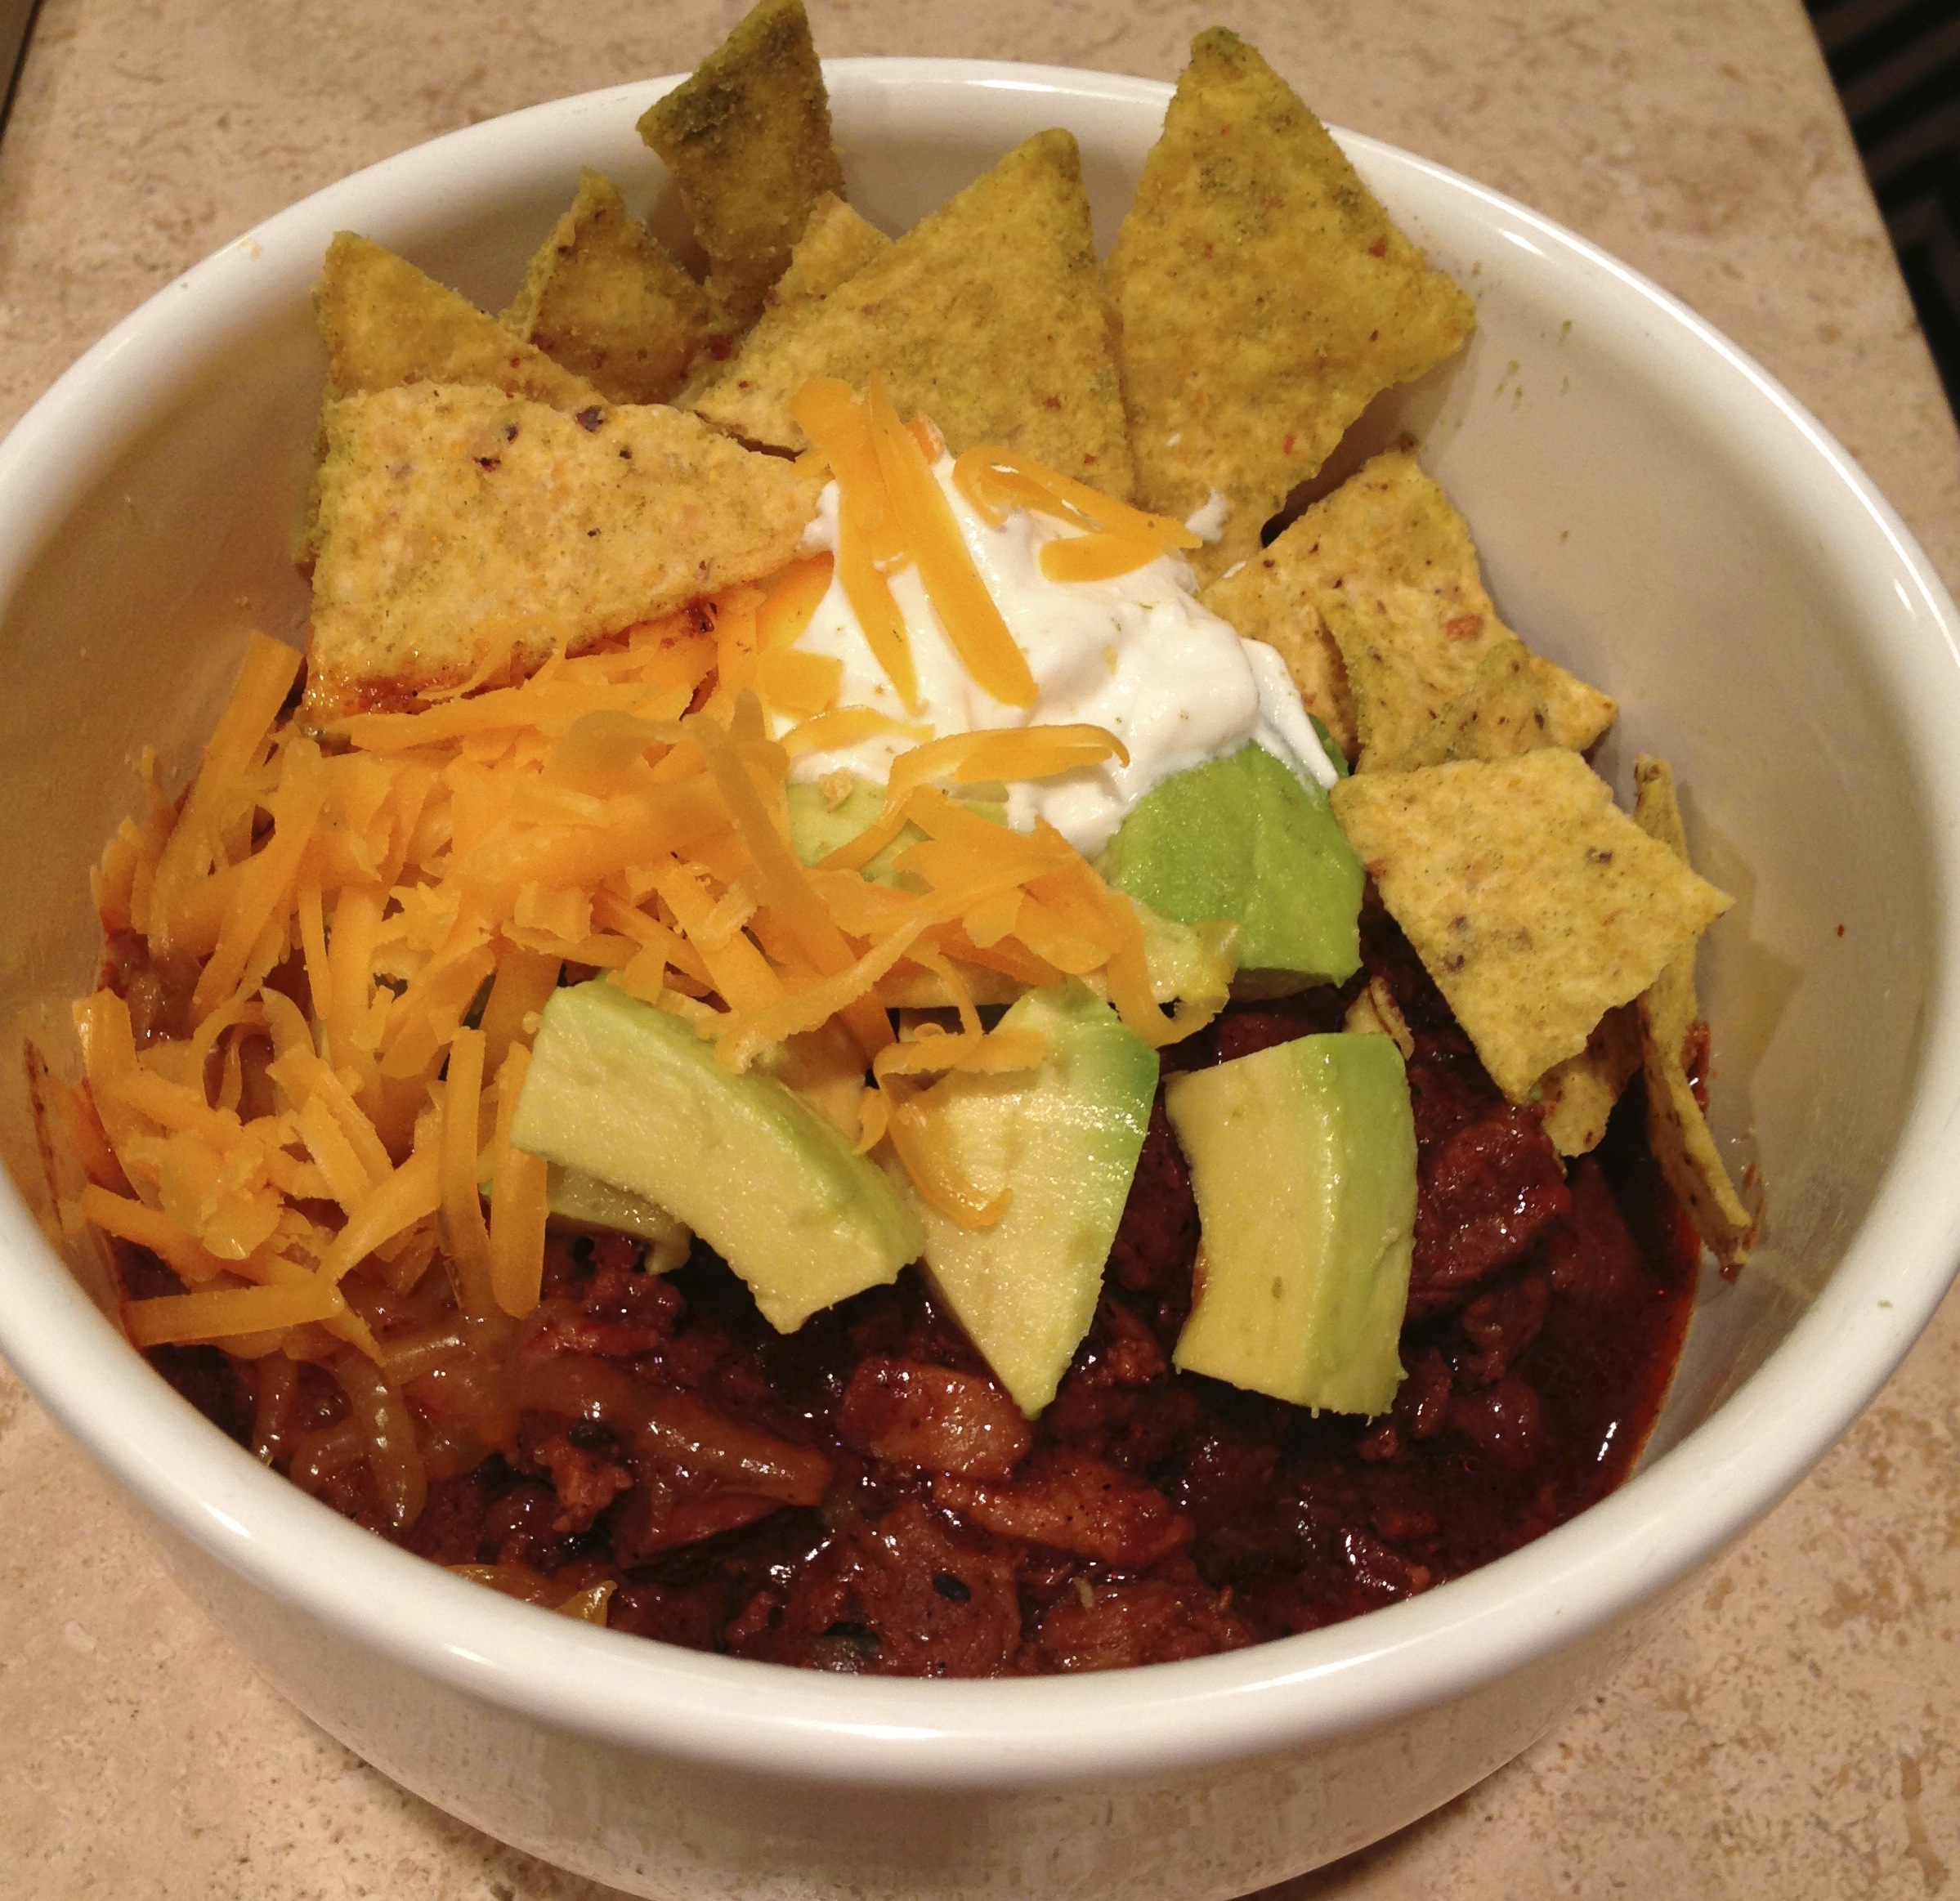
p.s. Its better the next day. And the next. But I don’t blame you if you can’t wait.
Smoky Beef Chili
(adapted from Daniel Boulud’s Braise)
4 dried ancho chiles
4 dried pasilla chiles
4 dried guajillo chiles
3 dried chipotle peppers
2 dried chilies de arbol
2 limes
2 tbsp. masa harina (if you can’t find this, use finely ground cornmeal instead)
2 tbsp. extra-virgin olive oil
2.5 lbs. beef chuck roast, cut into 1/2-inch cubes
1 1/2 lbs. ground chuck or ground round
1/2 lbs. bacon, diced
1 yellow onion, diced
4 garlic cloves, minced
1 tbsp. ground cumin
1 tbsp. fresh oregano, chopped
1 tbsp. sea salt
1 tbsp. red wine vinegar
1 1/2 tbsp. Worcestershire sauce
1 28-oz. can peeled, whole tomatoes
1 bay leaf
In a dry skillet over medium heat, toast the chiles for 7-8 minutes, shaking the skillet every few minutes to prevent them from burning. Then remove the skillet from the heat and let cool. Once they have completely cooled (you don’t them to steam while you are grinding them), discard the stems and seeds and then use a spice grinder to pulverize them into a powder. You probably cannot do them all at once (unless you have an industrial grinder) so just do a few at a time.
Zest and then juice the limes into a bowl. Add the masa harina and 3 cups of water. Combine and set aside.
In a Dutch oven over high heat, add the beef cubes and sear until golden brown on all sides, 10 to 12 minutes. Remove the beef cubes to a plate and repeat the process with the ground meat. These are fatty cuts of meat, so if too much liquid accumulates in the bottom of the pan around the meat, pour it out or the meat won’t sear. Remove the ground meat to a plate.
In the same pot, lower the temperature to medium-high and add the bacon. Cook until right before it becomes crispy, about 6-7 minutes. Then add the onion, cumin, oregano, and salt and cook until the onions are softened, 10 to 12 minutes. Add the garlic and cook for 2 more minutes. Stir in 1/3 c of the homemade chile powder and cook for 2 more minutes. Stir in the vinegar and Worcestershire sauce and scrape up any browned bits stuck to the bottom of the pot. Return the beef to the pot and add the tomatoes, bay leaf, and masa harina mixture. As you are adding the tomatoes from the can, squeeze (carefully! or juice will squirt out at you) each one until it breaks up slightly. You don’t want whole tomatoes. Also add the juice from the can. Bring the whole mixture to a simmer.
Cover the pot and transfer it to a 300 degree F oven for 2 hours, stirring halfway through. Remove the lid and cook for another 45 minutes – 1 hour, or until it is thickened to your liking. Serve with grated cheddar, tortilla chips, sour cream and avocados.
cheesy twice-baked potatoes
This post is dedicated to my cousins Renee and Justin.
They love twice-baked potatoes like Congress loves spending money we don’t have.
Anyway, the nice thing about this recipe is that even though I am going to give you measurements for the ingredients below, you can blow me off and improvise and they’ll still be delicious. This is actually more of a tutorial than a recipe. There’s just a few tips I’ll mention.
Here’s the first one: Using a fork or sharp knife, poke the potatoes all over. About 8 times per potato. I’ve never actually seen an un-poked potato explode in the oven, but my mom said it could happen. And honestly, it just takes a few seconds to pierce the potato, which seems like a lot less time than it would take to clean a potato-filled oven.
Bake potatoes at 350 degrees F for about 1 hour, or until they can be pierced easily with a fork. While still hot, hold the potatoes with an oven mitt, slice them in half, and scoop the insides into a stand mixer bowl. Reserve skins.
Here’s another tip: put a few slices of butter and the grated cheese in the bottom of the mixing bowl before adding the hot potatoes. That will make the butter and cheese start melting immediately so everything will combine better. On that note, ignore the picture below. I forgot to add everything before. C’est la vie.
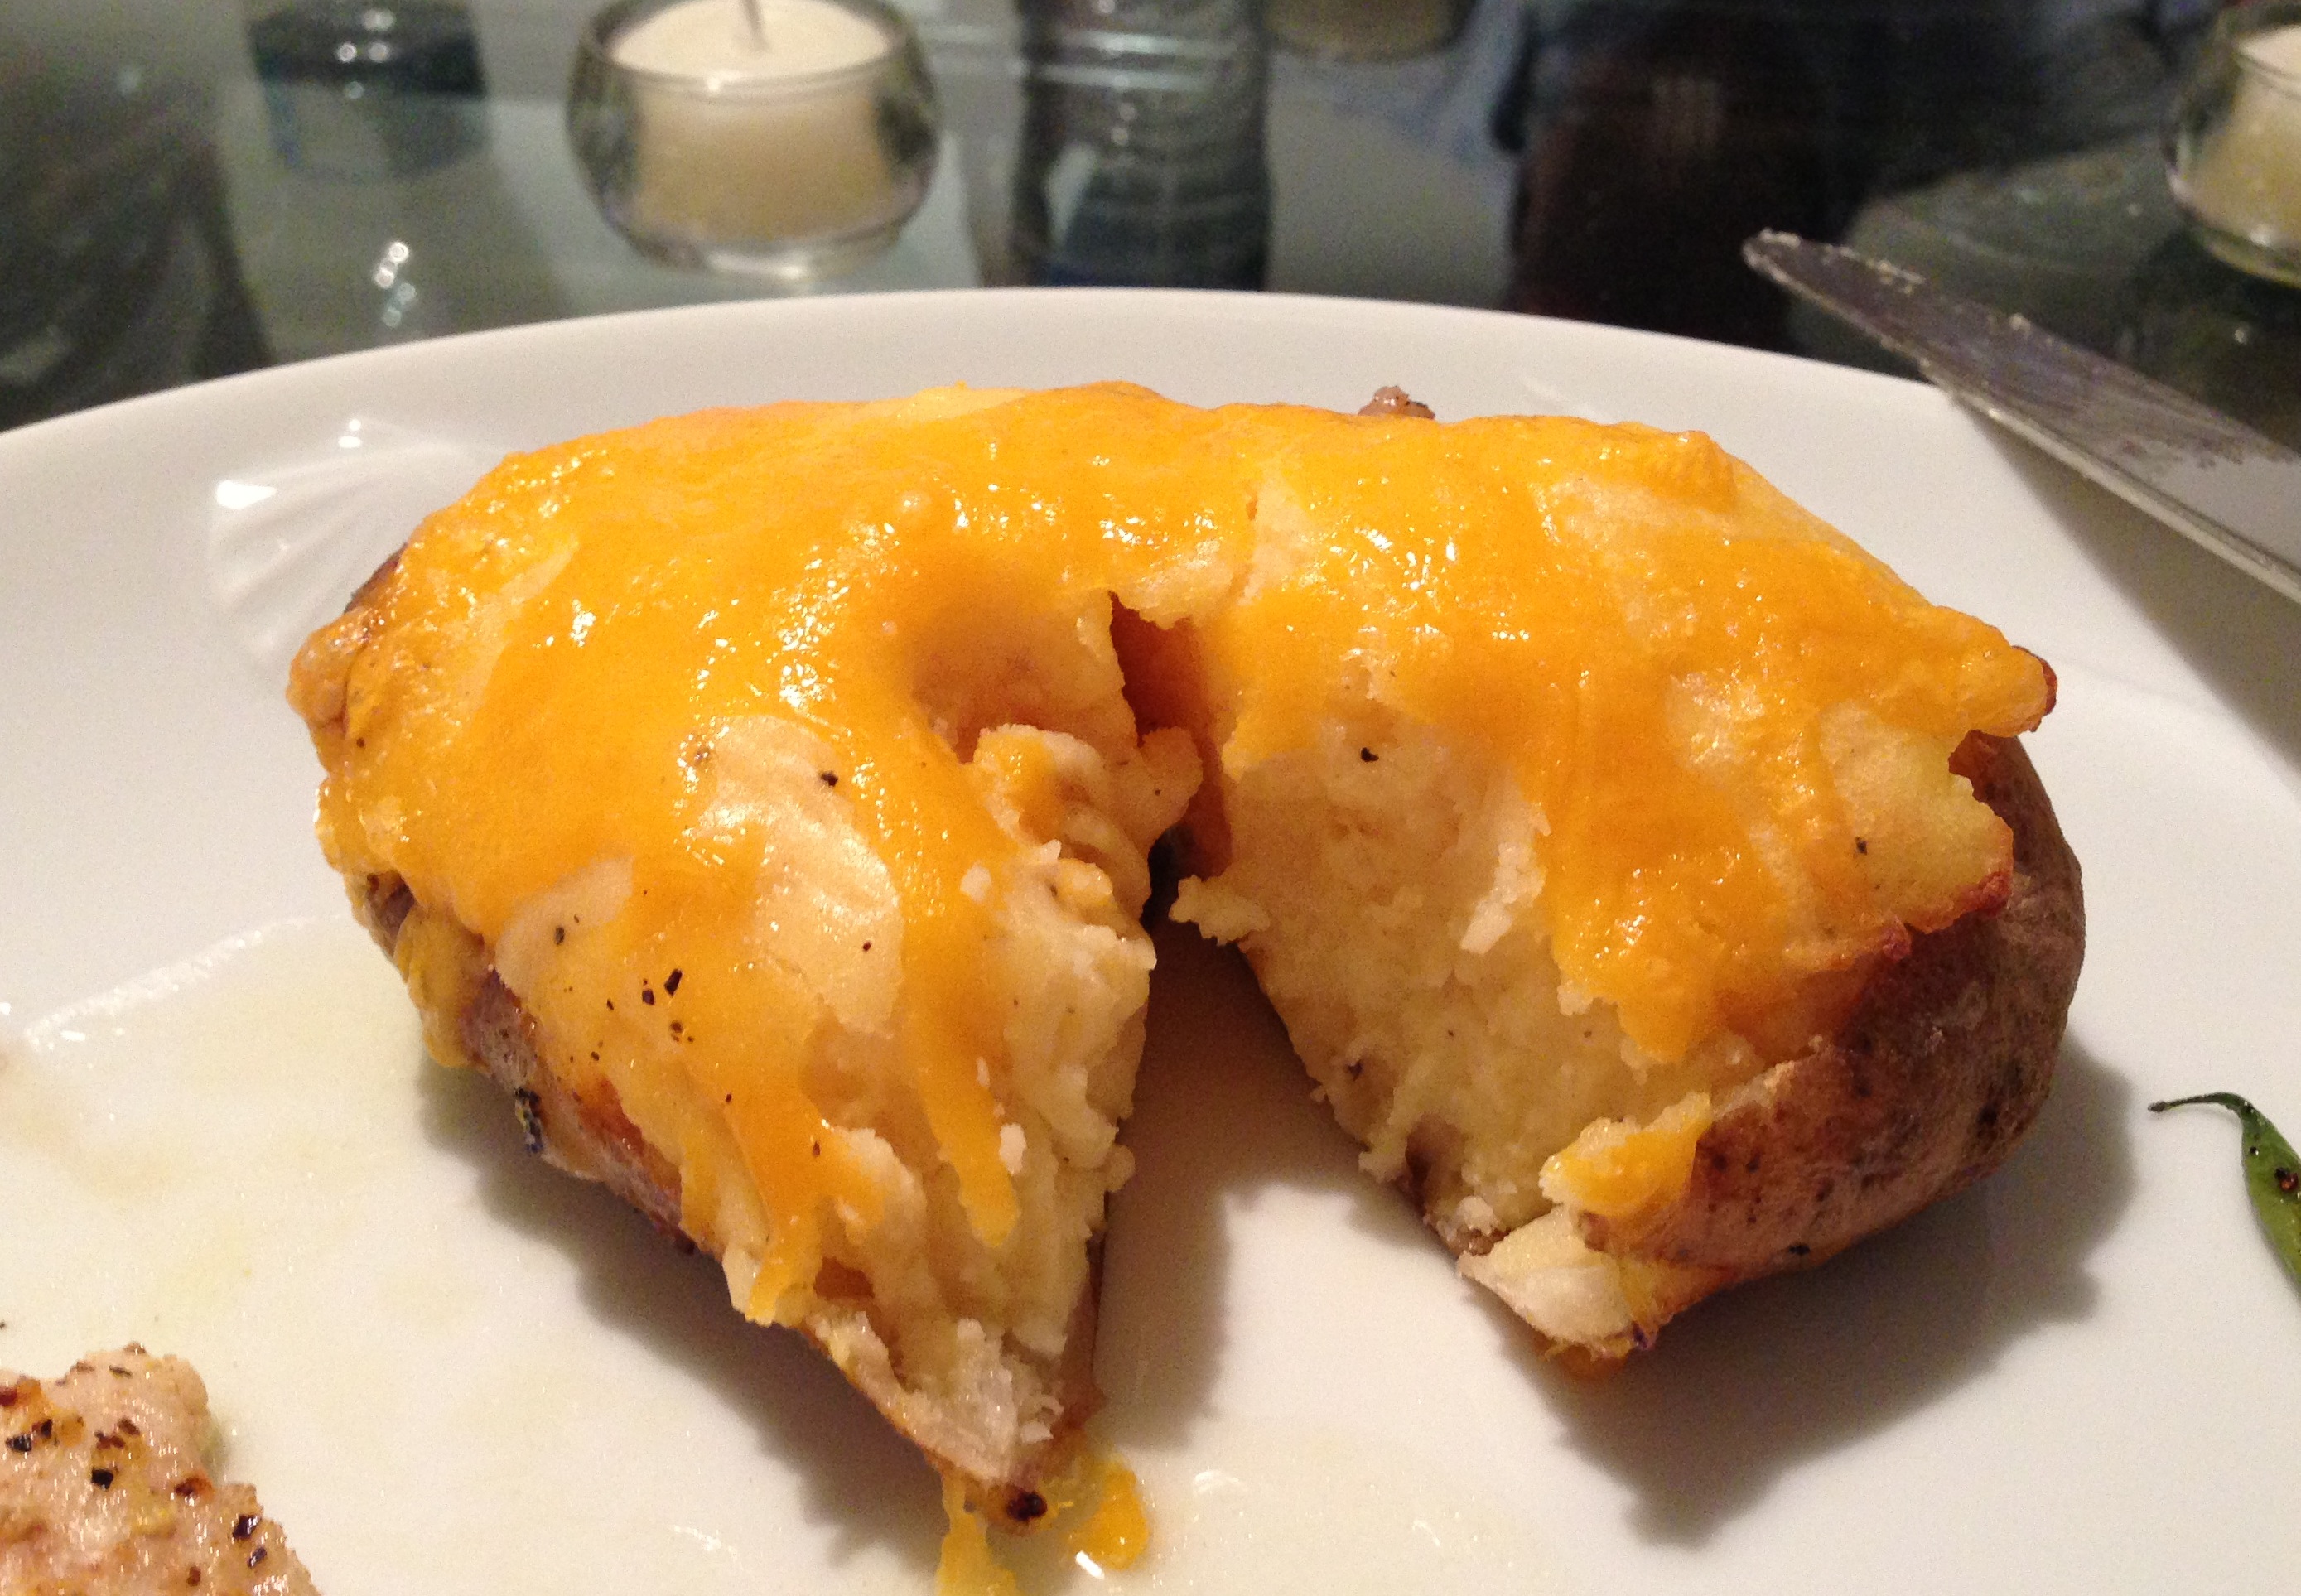
Mix until smooth, about 2 minutes at medium speed. Add the seasonings and sour cream and mix just until incorporated. Spoon mixture back into reserved potato skins.
Third tip: Be creative! Experiment with different mix-ins! You can add chopped green onions, chives, sautéed mushrooms, caramelized onions, chopped steamed broccoli, or crumbled bacon to potato mixture before stuffing.

Now you have two options:
1. Freeze ’em! Once they are filled, you can stick them on a cookie sheet and in your freezer for a few hours until they are frozen through. Then put them all in a ziplock and pull them out as needed. When you’re ready to cook them again, let them defrost on the counter before baking.
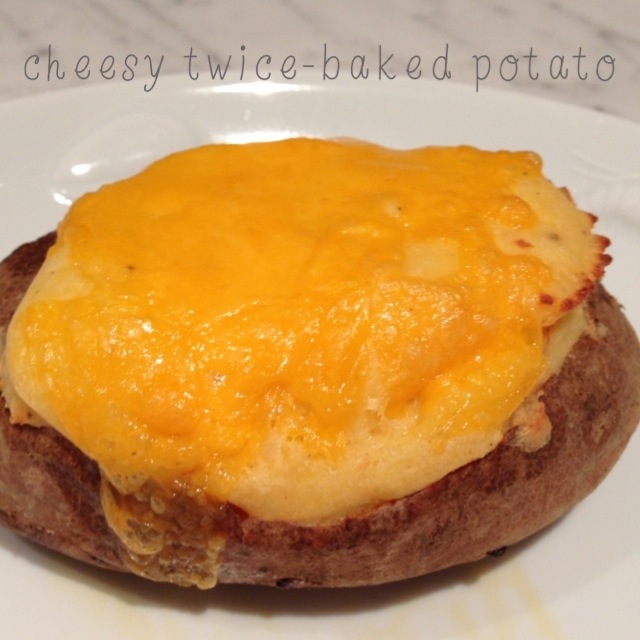
2. Sprinkle the remaining cup of grated cheddar cheese on the potatoes before baking. Bake at 350 degrees F for 35-45 minutes. Serve immediately.
Twice-Baked Potatoes
8 Idaho russet potatoes
1 stick butter
16 oz. sharp cheddar cheese, grated (about 4 cups)
16 oz. light sour cream
3-4 tsp. salt
1-2 tsp. white pepper
Using a fork or sharp knife, poke the potatoes all over. Bake potatoes at 350 degrees F for about 1 hour, or until they can be pierced easily with a fork. While still hot, hold the potatoes with an oven mitt, slice them in half, and scoop the insides into a stand mixer bowl. Reserve skins. Add the butter and 3 cups of the grated cheese to the potatoes and mix until smooth, about 2 minutes at medium speed. Add the seasonings and sour cream and mix just until incorporated.
Spoon mixture back into reserved potato skins. Sprinkle the remaining cup of grated cheddar cheese on the potatoes before baking. Bake at 350 degrees F for 35-45 minutes. Serve immediately.
These potatoes freeze well – just let them cool after stuffing and wrap them in a layer of saran wrap before putting them in a freezer ziplock. When you are ready to make them, thaw completely before baking for 45 minutes at 350 degrees F.
Optional:
Feel free to experiment with different mix-ins! You can add chopped green onions, chives, sautéed mushrooms, caramelized onions, chopped steamed broccoli, or crumbled bacon to potato mixture before stuffing.
parsnip and carrot chips
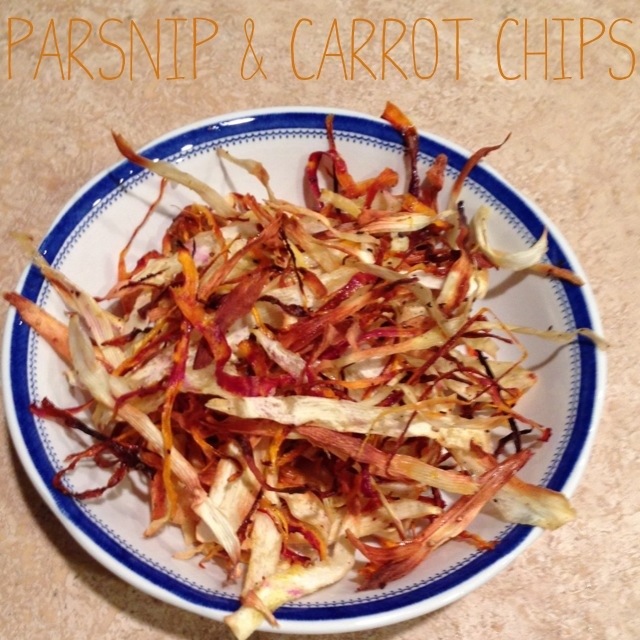
We got a bumper crop of carrots and parsnips in our last Farmhouse delivery. I put them in salads, snacked on them with hummus, and put them in sauces, but there were still so many! I decided to shave and roast them for a quick snack.

To make these, use your vegetable peeler to make thin strips. Toss them with a little olive oil, salt and pepper. Lay the vegetables on a cooling rack that has been placed on a cookie sheet. Bake them in a 400 degree F oven for 12-15 minutes, until lightly browned and crispy.

This is an easy, delicious snack with nutrients– win, win!
pork ragu and fettuccine
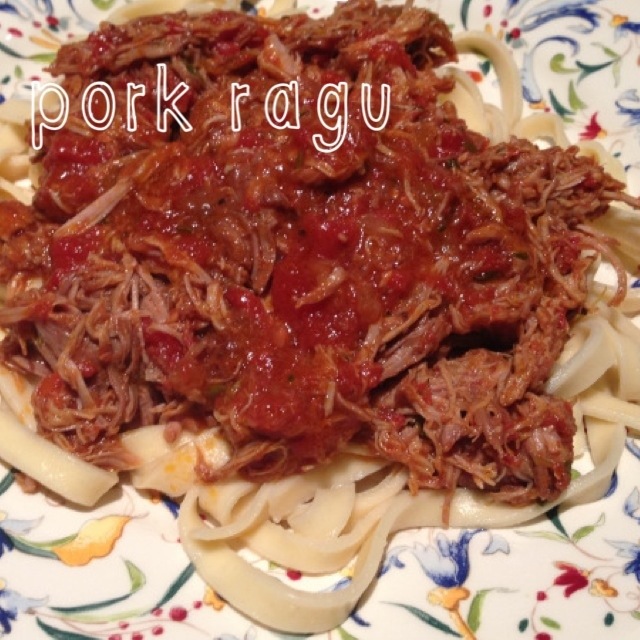
This is our new favorite, favorite dinner! It barely requires any work, makes our kitchen smell like heaven, and is even better for leftovers.
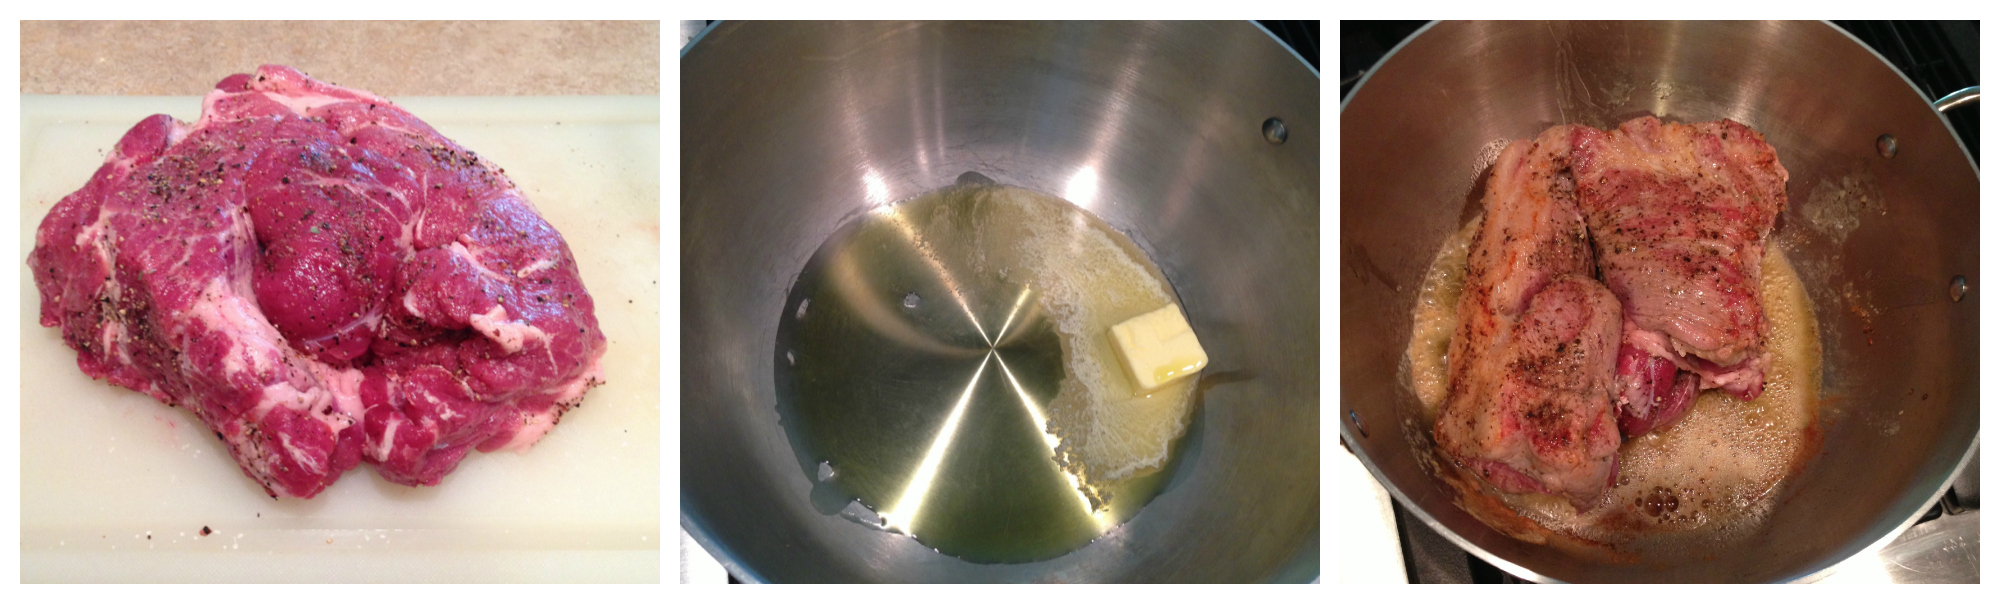
Salt and pepper the whole pork roast. Heat the butter and olive oil in a dutch oven over medium-high just until the butter melts, then add the pork roast and let it brown on each side – 2 to 3 minutes per side.
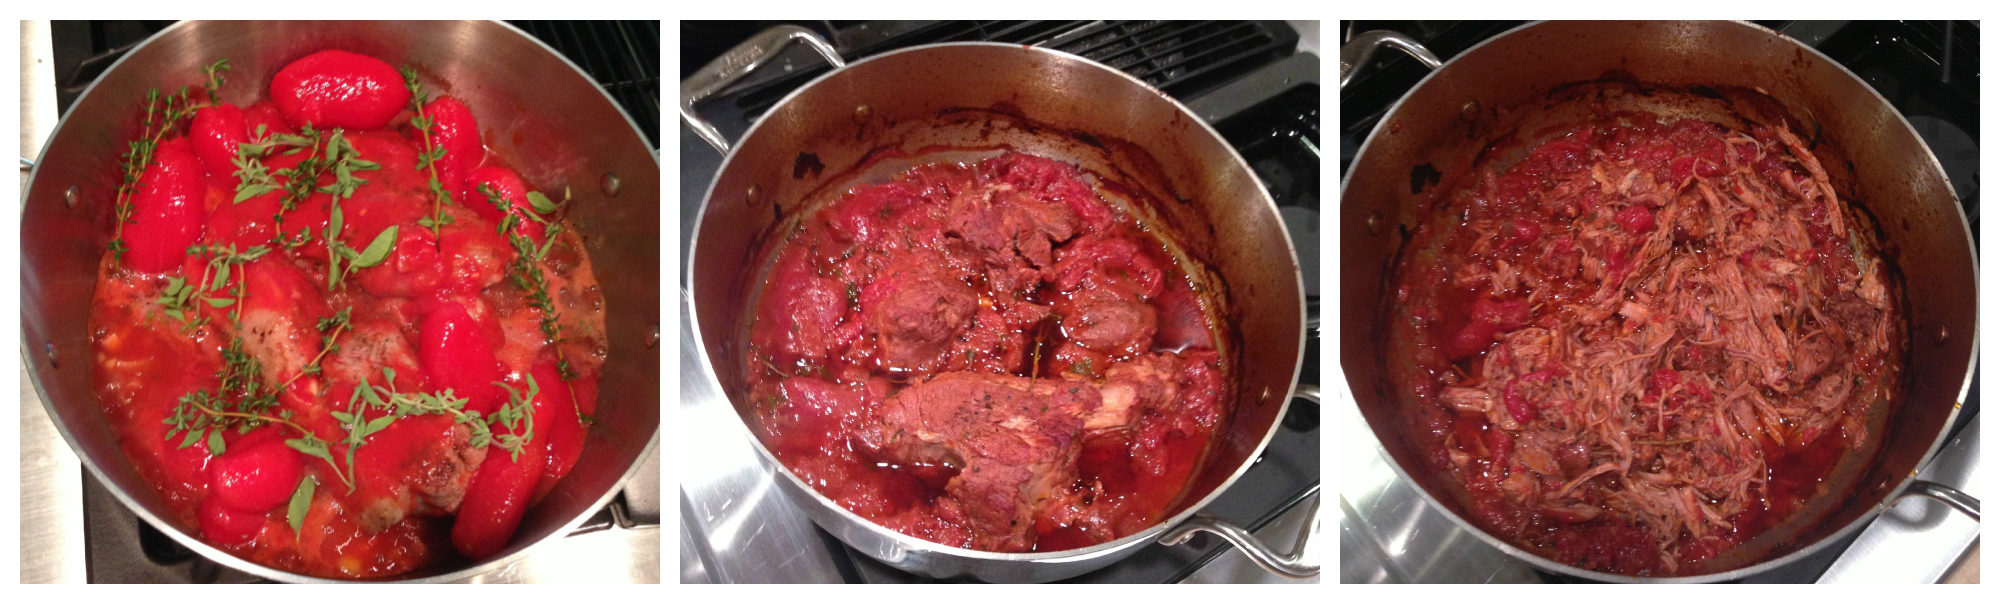
Once it is browned, add the garlic and onions and sauté just until they are translucent. Add the entire can of tomatoes (with juice), wine, thyme, oregano, hot sauce, mustard powder, and ground coriander. Bring it to a boil then cover and place the pot in a preheated 325 degree F oven.
By the way, do y’all ever use the mini bottles of wine for cooking? They’re about 7 oz (which is close enough to a cup!) and sometimes I don’t want to open a whole bottle (much less a nice bottle) to cook with when I am planning to drink something else. I’ve been on a total moscato-mixed-drink tear lately and wanted a sangria with dinner, even though it didn’t go with the pork. What can I say? I’ve always had weird cravings, and Whitney learned early on that there is no talking me out of something when I feel like eating or drinking it.

So once the pork is in the oven, braise it for 3-4 hours, turning the meat every hour. In the last hour or so, it should be hard to turn because the meat should be falling apart. Once it is really tender, use two forks to pull it apart (like the chicken tacos) then stir the sauce into the meat, coating all of it.
Stir in cayenne and balsamic vinegar (for a little extra heat and depth), then serve over fettuccine.
Pork Ragu and Fettuccine
(adapted from Dinner: A Love Story)
2 to 2 1/2-pound boneless pork shoulder roast
1/2 yellow onion, chopped
2 garlic cloves, minced
salt and pepper
2 tbsp. olive oil
1 tbsp. butter
1 large can whole san marzano tomatoes
1 c red wine
5 sprigs fresh thyme
5 sprigs fresh oregano
1 tbsp. hot sauce
1/4 tsp. mustard powder
1/4 tsp. ground coriander
1 tsp. cayenne
2 tbsp. balsamic vinegar
Fettuccine, for serving
Salt and pepper the whole pork roast. Heat the butter and olive oil in a dutch oven over medium-high just until the butter melts, then add the pork roast and let it brown on each side – 2 to 3 minutes per side. Once it is browned, add the garlic and onions and sauté just until they are translucent. Add the entire can of tomatoes (with juice), wine, thyme, oregano, hot sauce, mustard powder, and ground coriander. Bring it to a boil then cover and place the pot in a preheated 325 degree F oven.
Braise for 3-4 hours, turning the meat every hour. The meat should be falling apart. Use two forks to pull it apart, like the chicken tacos, then stir the sauce into the meat, coating all of it. Stir in cayenne and balsamic vinegar, then serve over fettuccine.

