whole30 mango ahi poke
 Well, as some of you may know, we are not exactly the picture of Whole30 success stories… I had a bit of a kitchen “incident” the other night in which I chopped off the tip of my left thumb. It took very little time for me to find and finish a bottle of white wine. #RIPwhole15

(It is probable that you, like me, find this bandaging situation highly dramatic for a thumb wound. However, this is a very appropriate place for a shoutout to Josh, who is mostly my neighbor but also has a day job as an orthopedic surgeon. Big thanks for your skillz in bandaging my digit the other night, Josh.)
Anyway, even though we are slightly off of the strict Whole30 regimen, this recipe for Mango Ahi Poke is staying in our regular rotation. I think the coconut aminos* are the key. They are my favorite discovery from Whole30.
Coconut aminos are made by aging coconut blossoms, and they are basically a good sub-in for soy sauce if you’re trying to avoid gluten or soy. Also, even though the coconut blossoms are aged with salt, coconut aminos have less than 1/2 of the sodium than soy sauce does. The taste is not exactly the same – coconut aminos are a teensy tiny bit sweeter, but they still have a deep umami flavor.
*every time I type “aminos” my computer wants to change it to “amigos” which is actually kind of apropos since they are my new friend.
Whole30 Mango Ahi Poke
Serves 2
10 oz. ahi (yellowfin) tuna, diced
2 ripe avocados, halved and pits removed
1 mango, diced
2 tbsp. coconut aminos
1-2 tsp. sesame oil (to taste)
1 tsp. black sesame seeds
2 macadamia nuts, crushed
1 green onion, sliced thinly
Combine the coconut “amigos” and sesame oil in a bowl. Add the tuna and stir until all of the tuna is well coated. Add the mango and toss until just combined. Scoop the tuna-mango mixture into the avocado halves and top with sesame seeds, crushed macadamia nuts and sliced green onions. Serve immediately.
whole30 asian steak + veggie bowls

We used to be friends with our neighbors Ashley and Brad. In fact, I would go as far as saying they were some of our best friends.
That was until they talked us into doing Whole30 with them and we got to day 4 and decided that we hated everyone and everything. Turns out, we might have had a little bit more of a sugar addiction than we realized…
But, just like they promised, we’re over the hump (HALLELUJER 🙌🏻) and actually feeling like we’ve got a little tiger blood in us!
Here’s the thing with Whole30. It takes some work. There is menu planning and meal prep and not eating the chocolate that lives in your pantry. But also, there’s sleeping well and having more energy and feeling like a badass for being able to resist bread.
Anyway, this is totally Whole30 compliant, but its something we’d eat whether we were adhering to Whole30 or not. If you’re not on Whole30 and you don’t feel like dealing with cauliflower rice or you just happen to really like regular rice better, then sub it in. You do you.
Whole30 Asian Steak + Veggie Bowls
serves 2
12 oz. flank steak
1 red or orange bell pepper, sliced into strips
2-3 heads baby bok choy
6-8 oz. shiitake mushrooms, stems removed, caps sliced
1 green onion, sliced
Black sesame seeds
Sesame sauce (see below)
Cauliflower rice (see below)
Sesame sauce:
5 tsp. coconut aminos
2 tsp. sesame oil
1 tsp. freshly grated ginger
2 cloves garlic, minced
Cauliflower rice:
1 head cauliflower
1 small yellow onion, diced
2 cloves garlic, minced
1 tbsp. ghee
salt + pepper
In a bowl, combine all of the ingredients for the sesame sauce. Set aside.
To make the cauliflower rice, remove the florets from the head of the cauliflower and place in a food processor. Pulse until they are resemble rice. In a sauté pan, cook the onions in the ghee until they begin to brown. Add the cauliflower rice and the garlic and sauté for 2-3 minutes. Season with salt + pepper.
Season the flank steak with salt and pepper and drizzle with coconut aminos on both sides. Set aside.
In a skillet, cook the bell pepper until it is softened and slightly caramelized, about 4-5 minutes over medium heat. Remove to a plate. Add the bok choy to the pan and cook for 3-4 minutes until it has wilted. Finally, add the shiitake mushrooms to the pan and cook just until they soften and brown, about 3-4 minutes.
Add the flank steak to the pan and cook for 4-5 minutes on one side. Flip and cook for 5-6 minutes on the other side, or until it reaches your desired temperature – about 135 degrees for medium rare. Remove from the pan and slice across the grain.
Fill the bottom of a bowl with the cauliflower rice, then layer the vegetables and meat. Top with the green onions, black sesame seeds, and drizzle with the sesame sauce.
america’s jell-o shots
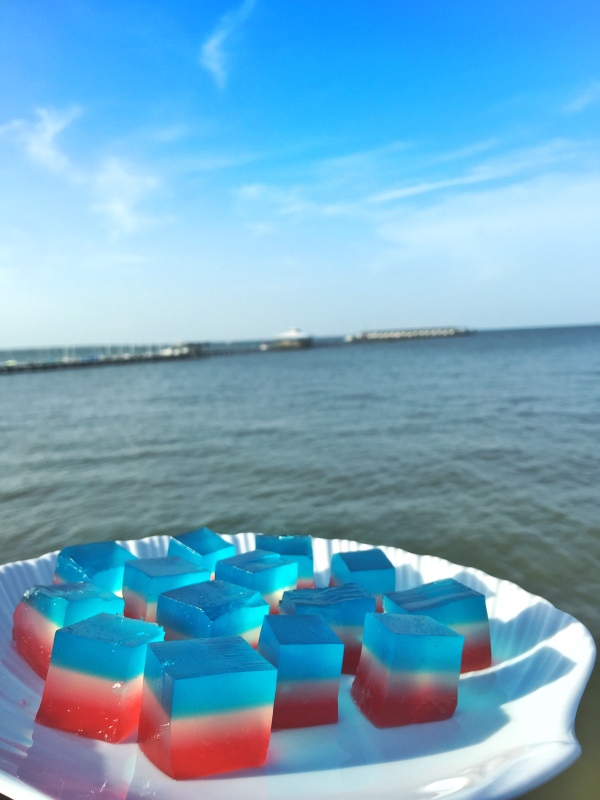
Big questions for the weekend… what are you putting on the BBQ: pork ribs or beef brisket? what kind of tunes will you be rocking to during the fireworks show: Texas country or throwback hip-hop? and what better way to celebrate the birth of our great nation than with patriotic mojito jell-o shots?
Happy birthday, America! Celebrate big, folks.
America’s Jell-O Shots
3 c water, divided
3 c sugar, divided
12 packets unflavored gelatin
2 1/4 c freshly squeezed lime juice, divided
18 mint sprigs, divided and leaves removed
2 1/4 c white rum, divided
red & blue food coloring
special equipment (optional):
silicone ice cube tray (1 oz per cube)
In a saucepan over medium heat, stir 1 c sugar into 1 c water until it dissolves. Lower heat to low and stir for another minute to cool. Slowly (very slowly!), stir in 4 packets of gelatin, one at a time, whisking until dissolved. Remove from heat and stir in 3/4 c lime juice and the torn leaves from 6 mint sprigs. Let steep for 15 minutes. Remove the mint leaves and stir in 3/4 c rum. Add 5-6 drops of blue food coloring and stir to distribute evenly.
If using a silicone ice cube tray, spray with Pam or other nonstick cooking oil and wipe lightly with a paper towel to remove excess. Pour 2 teaspoons of the mixture into each well. Refrigerate for 3-4 hours, until firm.
If using a 9″ x 13″ pan, spray with Pam or other nonstick cooking oil and wipe lightly with a paper towel to remove excess, then pour the mixture on the bottom of the pan. Refrigerate for 3-4 hours, until firm.
Repeat the process above two more times. Make sure to give it 3-4 hours to set between each layer. Leave food coloring out of the second mixture, and add red to the third mixture.
If using a silicone ice mold, simply pop the Jell-O shots out of each well. If using a 9″ x 13″ pan, use a knife to cut squares and remove carefully.
salmon pizza

When I was a kid, one of my favorite family traditions was homemade pizza night. My dad thought it was great fun to spread the sauce and sprinkle the cheese on the pizza and then have my sister and I stand across the kitchen and lob toppings towards the pizza like we were in target practice. Jennifer really enjoyed that action, but I’ve always been far too Type-A. I found it much more satisfying to carefully arrange each topping on the pizza so that every bite contained the exact proportion of ingredients that I liked.
Nowadays, Whitney and I make homemade pizza one or two times per month. We’re creatures of habit, so most of the time we have sausage, mushroom, and onion pizza, however this is one of our favorite alternatives. King salmon (also called Chinook salmon) is the most prized kind of wild Pacific salmon in Alaska – it is tender, flaky, and has a rich flavor. The King salmon makes this pizza decadent but not too heavy.

Salmon Pizza
pizza dough*
1 c. heavy whipping cream
1 yellow onion, diced
1 tbsp. butter
1 tbsp. avocado oil**
2 cloves garlic
10 oz. fresh wild King salmon
1 tsp. fresh thyme, chopped
1 bunch chives, sliced into 1/8″ long pieces
Preheat the oven to 435 degrees F. Cook the pizza dough until it is golden brown. Remove from oven and set aside.
Slice the salmon into pieces about 1/4″ thick. Set aside.
In a medium pot, sauté the diced onions with the oil and butter over medium heat until they are translucent. Turn the heat down to medium-low and cook for 4-5 more minutes, until right before they begin to caramelize. Add the garlic and cook for 1 more minute. Add the cream and cook, stirring occasionally, for 10 minutes until the sauce thickens. Remove from heat and stir in thyme leaves.
Spread the sauce over the cooked pizza crust. Lay the pieces of salmon on the sauce evenly across the pizza. Bake at 375 degrees F for 10-12 minutes, until salmon is cooked. Remove from oven and sprinkle with sliced chives.
* You can definitely use Pillsbury pizza dough, but I have found that you can buy a ball of uncooked pizza dough from Whole Foods or your local pizza joint, and it is usually way better.
**Avocado oil has a higher smoke point than olive oil, so I tend to use it for sautéing. You can use olive oil here, but cook the onions over a lower heat.
stone-ground grits with prosciutto, shiitakes and gruyere sauce

Hi! I know it’s been a while…
In an effort to hold myself accountable to regular posting, I am starting a series called “State Dinners.” Each week I will post a recipe inspired by one of the 50 states. I’m thinking this will go in alphabetical order, but who knows? Maybe the Spirit will move and we’ll jump to South Dakota next.
This first recipe is dear to my heart even though it is from the state in which the college-football-coach-who-shall-not-be-named resides. Grits have always been a staple in our household. Frustratingly, there is nothing you can rush about good grits. They need time to cook slowly and absorb the liquid. My mom taught me to make grits with heavy cream, not just water. So basically, we are making holy food.
p.s. Because you probably need more butter as much as I do, which is about as much I need a hole in my head, here’s a great way to enjoy leftover grits… pack the grits into a square or rectangular dish and refrigerate. When you are ready to eat them, remove the grits and cut into 1″ slices. Heat a few tablespoons of butter in a pan until it is sizzling and lay the slice of grits on the butter. Cook for a minute or two, until browned, then flip and cook the other side. Crispy outside, creamy inside. You’re welcome.
The recipe below is based on the baked grits from the Highlands restaurant in Birmingham. My recipe is more like a soufflé, gaining fluffiness from the addition of two beaten eggs and a lush consistency from the heavy cream. The grits are savory but not overwhelming – much of the dominant flavor comes from the salty prosciutto and rich Gruyere sauce.
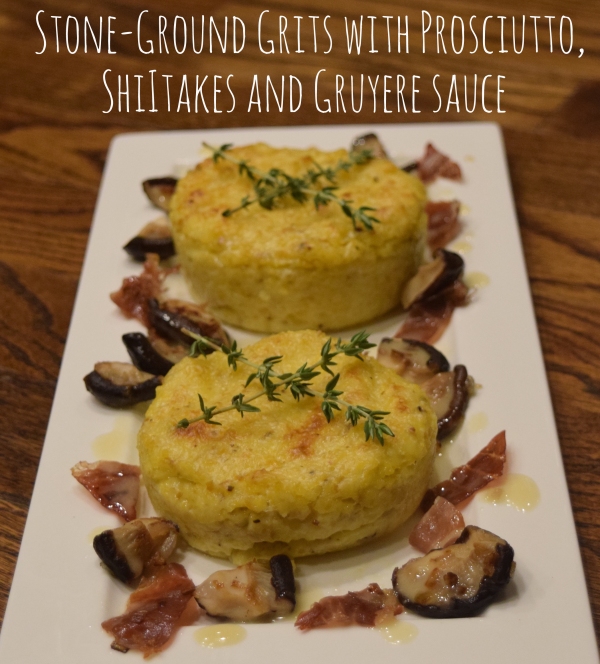
Stone-Ground Grits with Prosciutto, Shiitakes and Gruyere Sauce
Grits:
1 c. stone-ground grits
1-2 tsp. salt
2 c. heavy cream, divided
2 tbsp. butter, softened
¼ c. grated Gruyere
pepper, to taste
2 eggs, beaten
Gruyere Sauce:
½ cup white wine
¼ cup sherry vinegar
2 shallots, minced
1 bay leaf
1 slice prosciutto
1 tbsp. heavy cream
1 stick butter, cut into 8 slices (1 tbsp. each)
2-3 tbsp. grated Gruyere
salt and pepper, to taste
1 tbsp. olive oil
3-4 slices prosciutto, cut into 1” pieces
½ cup shiitake mushrooms, stems removed and caps cut into 3-4 pieces
1 shallot, minced
thyme, for garnish
Preheat the oven to 375 degrees F. Use softened butter to grease the insides of four 6-8 ounce ramekins. Set aside.
In a greased saucepan, bring 2 cups of water and 1 cup of heavy cream to a boil. Add the salt and grits and stir to combine. Lower the heat to a simmer and cook, stirring every few minutes, until the grits are thickened. This will take about 45 minutes. Stir in an additional cup of heavy cream and continue to cook for 5-10 minutes longer until the heavy cream is absorbed. Turn the heat off and stir in the butter, Gruyere, and pepper. Once combined, add the beaten egg and stir to combine. Stir the egg in quickly so it doesn’t curdle.
Pour the grits into the buttered ramekins. Place the grits-filled ramekins in a 9” x 13” baking dish and add water to the dish so it comes halfway up the sides of the ramekins, probably 1″. Cover the 9” x 13” dish tightly with foil. Bake for 20 minutes. Remove the foil and continue to cook for 15 more minutes. Finally, turn the heat to broil and cook until the tops are golden brown.
While the grits are in the oven, prepare the sauce. In a saucepan, bring the wine, sherry vinegar, minced shallots, bay leaf and prosciutto to a boil. Cook until most the liquid has evaporated, leaving just 1 tablespoon of the liquid in the pan. Turn the heat to a low simmer and stir in the heavy cream and a tablespoon of butter. Whisk to combine. Once it has melted, whisk in each additional tablespoon of butter one at a time, adding each piece of butter only after the last one has been fully incorporated. Turn the heat off.
Pour the sauce through a strainer into a small bowl. Then pour the strained sauce back into the saucepan and add the grated Gruyere and pepper. Set aside.
In a sauté pan, heat a tablespoon of olive oil and add the minced shallots. Cook for 2 minutes over medium-high heat and add the sliced prosciutto. Cook for 2 more minutes and add the chopped shiitake mushrooms. Add one more tablespoon of olive oil and cook until the mushrooms have softened and the prosciutto starts to become crisp, about 3 more minutes.
Turn the grits out of the ramekins and place on dishes with the browned tops facing up. Scatter mushroom, shallot and prosciutto mixture around the grits and spoon the Gruyere sauce over the grits. Garnish with thyme.

For about two years, Whitney and I ate at an Italian restaurant that had a Brussels sprouts salad on the menu. I avoided it like the plague, thinking that there was no way it could be good since I consider Brussels sprouts about the equivalent of dog food.*
One night, we were at the restaurant with a big group and someone ordered the salad, and because I am horrified that people might think I am a picky eater (I’m not! I promise! I grew out of it!), I decided to try it.
REVELATION.
Seriously, I could not get enough. So here’s a bright, tangy recipe for a Brussels sprouts salad (with kale added for vitamins) that I think you’ll love!
*At this point, I had only had boiled Brussels sprouts. You’ll have to excuse my past ignorance. I now love them raw and roasted.
Shaved Kale and Brussels Sprout Salad with Pancetta and Tart Dried Cherries
1 large lemon
½ tsp. sea salt, plus more to taste
¼ teaspoon ground black pepper
1 tsp. freshly ground black pepper
3 tablespoons extra-virgin olive oil
½ cup dried unsweetened tart cherries
6 oz. pancetta
1 lb. Brussels sprouts, shaved thinly on a mandoline
8 large leaves Tuscan kale, sliced into thin ribbons
Zest the lemon and reserve zest. Juice the lemon and whisk it with salt, pepper, and olive oil. Add cherries to the mixture, stir and set aside.
Sauté the pancetta until crispy and brown. Remove the pancetta from the pan and pour the grease into a bowl. Toss the Brussels sprouts and kale in the grease, then add the cherries, dressing and pancetta. Toss everything to combine. Sprinkle reserved lemon zest on the top of each salad before serving.
tuesday things, vol. 20
 my favorite instagrams this week
A few things I’m thinking about, reading, or loving right now:
- I am addicted to this game.
- Would you move to a neighborhood built around a farm?
- This essay made me think twice about being critical of myself – you never know what impact your careless thoughts have on someone.
- Badass traveler!
- I seem to have adopted yoga clothes as my daily uniform, which apparently makes me appear authoritative.
- Beautiful slow-motion dance moves by the Washington Ballet.
- “Plans or no plans, keep a little space in your heart for the improbable. You won’t regret it.” And other advice that powerful women would have given their 22 year old selves.
- Skinny jeans threatened the US money supply. The mint’s cotton-blend paper supplier was forced to innovate when denim makers started incorporating spandex. (h/t Quartz)
- I think you all know by now how much I love the National Geographic photo contest.
xoxo
p.s. Happy 8th anniversary to my love! Cheers to us!

blender chocolate mousse

Let me preface this by saying: this mousse does not make sense.
Making mousse usually requires a good bit of work (melting, beating, whipping, folding). Here, you just add a few ingredients to the blender and boom. Mousse.
The key with this recipe is time — not slaving-away-time, but let-it-sit-in-the-fridge-time. Unfortunately, you can’t start making this mousse right before everyone arrives for dinner and expect to serve it an hour later. But if you plan a bit ahead, you’ll have an easy, rich dessert with which everyone will be impressed!
Blender Chocolate Mousse
1 1/3 c. good-quality semi-sweet chocolate chips (such as Ghirardelli)
1 c. water
2 tbsp. + 1 tsp. sugar
2 tsp. espresso powder
1 tbsp. + 1 tsp. vanilla extract
4 egg whites
for the whipped cream
1 c. heavy whipping cream
1 tbsp. sugar
1 tsp. vanilla extract
Bring water to a boil then remove from heat. Add the espresso powder and sugar. Stir and let sit for 4-5 minutes.
Place the chocolate chips and vanilla extract in the blender, then pour the hot water in. Cover the blender and let the mixture sit for one minute (the chocolate will start to soften). Blend for 25-30 seconds. Add the egg whites and blend for another 60 seconds.
Pour the mousse into four serving containers (small bowls, ramekins, short mason jars). Cover with saran wrap and refrigerate until set. This will take about 4 hours, but can be done up to 24 hours in advance.
When ready to serve, beat whipping cream with sugar and vanilla. Serve mouse with a spoonful of whipped cream.
dense chocolate cake

I’d had a really, really great flourless chocolate cake at a restaurant earlier this year and was obsessed with recreating it at home. I tried three different recipes (utter and total failures) before landing on one from Food52. The trick was that it wasn’t actually flourless. One little tablespoon of flour gave it just the right texture — not too chewy and no need for a complicated water bath.
It is quick, super simple, and I always have all of the ingredients in my pantry so it pretty much became my dinner party staple for 2014. There is a high likelihood that if you ate my house this spring or summer, this was the dessert we had.
Easy + delicious = repeat appearances in my kitchen.
Dense Chocolate Cake
(from Food52)
7 oz. 72% dark chocolate, roughly chopped
7 oz. butter, cut into 1/2″ cubes
1 1/3 c sugar
5 eggs
1 tbsp. flour
8 oz. whipping cream
1/2 tsp. vanilla
2 tsp. sugar
fruit for garnish (pomegranate seeds, raspberries, blueberries)
Pre-heat the oven to 375 degrees F. Cut a sheet of parchment to fit in the bottom of a 9″ cake pan. Grease the pan with butter or cooking spray.
Melt the chocolate and butter together in a double boiler. Use a whisk to combine until they are fully melted. Whisk in the sugar and then remove the pan from the heat. Let cool for 3-4 minutes.
Add the eggs one at a time, being sure to fully whisk each one in before adding the next. Then whisk in the flour.
Pour the batter into the cake pan and bake for 25 minutes. When you remove the pan from the oven, set it on a cookie cooling rack for 10-15 minutes. To remove the cake from the pan, invert it onto a plate and then revert it onto your serving dish. Cool completely before serving.
Serve in wedges with whipped cream and fruit.
tuesday things: newsletter edition

I’m kinda embarrassed to admit it, but I usually reach over and grab my phone in the morning before even saying “good morning” to Whitney. I’m not the only one, right?
I do a pretty good job of keeping spam to a minimum (I’m liberal with the unsubscribe link), but no matter how low I get my inbox before I go to bed, it always feels like it is overflowing in the morning.
But there are seven emails that I really do look forward to… and I think you should know about them all too! Here’s a quick peek at what I’m reading in the mornings:
News Digests
theSkimm
theSkimm is a daily (Monday-Friday) e-mail newsletter that offers a breakdown on 5-6 trending news items, with background to get you up to speed and clever commentary.
Even if I’m in a rush and don’t read any of the other news digests in the morning, I still don’t skip theSkimm.
Quartz Daily Brief
Quartz Daily Brief bills itself as the best morning briefing for smart, busy people. Their global team of reporters catches you up on news from around the web and prepares you for the day ahead. Three editions are curated by region: Americas, Europe and Africa, and Asia.
It is mostly politics- and market-focused. I especially like the “Matters of Debate” and “Surprising Discoveries” sections.
NextDraft
A digest of the top ten most fascinating items of the day, delivered by Dave Pell with witty commentary. I read somewhere that its a mashup of The New York Times, The Daily Show, and Twitter — and I totally agree. Well worth reading.
Now I Know It
This doesn’t really fall into the news category — it is basically a couple of paragraphs about a topic that you probably never knew you even wanted to know about. You’ll learn things like: Abraham Lincoln created the secret service – on the day he was shot, how Trader Joe’s Two Buck Chuck is made, that carrots used to be purple, and how turkey got its name.
Devotionals
She Reads Truth
She Reads Truth is an online movement of women committed to daily reading and being changed by God’s Word. Every 1-3 weeks, SRT starts a new reading plan with a different focus — sometimes it is a book of the Bible, sometimes it is thematic (such as ‘justice’). The daily emails (Monday-Friday) include a few scripture references and a devotional.
If:Equip
If:Equip is a Bible reading plan. The daily emails (Monday-Friday) contain a passage of scripture and focus questions. The questions are always the same: if you believe this to be true… then what does this mean about god? what does this mean about you? what does this mean about the world?
I like how the questions take the focus off of always trying to decipher a personal meaning in all of scripture. True, the Bible is meant to illuminate our individual lives, but it is an ancient text written in many different contexts, to many different people and communities. Asking what the scripture means about the world and about God helps me to step back and refocus on the greater community.
Red Letter Wake Up
Red Letter Wake Up will help you start your day with the words of Jesus! Each morning you’ll receive a short email with a quote from the body of Christ, the “red letter” words of Jesus, and one tangible thing you can do to be the hands and feet of Jesus in the world today.

